If you’re looking for ideas for Christmas gifts for foodie friends or family, or if you’ve got a large group of people who you want to give Christmas gifts to, such as colleagues or team members, then biscotti is the perfect answer. Biscotti are twice baked almond biscuits that are dry and crunchy, often served with sweet wine or coffee to dunk in. They’re popular as a Christmas gift because of their festive flavours and the fact that they keep well for up to a month after baking. Biscotti originate from the Tuscan city of Prato (back in the 14th century), and the name means “twice baked”, but in Italy these biscuits are also often known as “cantuccini”. The dough is first baked as a log and then sliced up to make the oval biscuits, that are baked again to make them crunchy. Whether included as part of a festive hamper or given as small gifts to colleagues, nothing shows that you care like baking, and nothing’s easier to bake and gift at this time of year than biscotti. Give it a go, and get ahead for Christmas!
INGREDIENTS
350g plain flour, plus extra for rolling 2 tsp baking powder 2 tsp mixed spice 250g golden caster sugar 3 eggs, beaten 1 orange, coarsely zested 85g sultanas 50g blanched almonds 50g your choice of other nuts
METHOD
Heat your oven to 180C, 160C fan or gas mark 4, and line two baking sheets with baking paper. In a large bowl, mix together the flour, baking powder, mixed spice and sugar. Stir in the eggs and zest until the mixture starts forming clumps, then bring the dough together with your hands – it will seem dry at first but keep kneading until no floury patches remain. Add the fruit and nuts, then work them into the dough until evenly distributed throughout. Turn the dough out onto a lightly floured surface and divide into four pieces.Roll each piece into a thick sausage about 30cm long. Place two on each tray, spaced well apart as they will increase in size as they bake. Bake for 25-30 minutes until the dough has risen and spread, and feels firm. It should still look pale. Remove from the oven and turn it down to 140C, and place the baked dough on a wire rack until cool enough to handle. Use a bread knife to cut the dough on the diagonal into 1cm thick slices, then lay the slices flat on the baking sheets. Bake for another 30 minutes, turning them over half way through, until dry and golden. Remove from the oven and tip out on to a wire rack to cool completely, then bundle up and gift wrap, or enjoy a few yourself with a coffee or glass of desert wine to dunk in.
Whether you call them cinnamon twists, rolls, scrolls or buns, the one thing that we can all agree on is that they’re delicious and one is never enough.
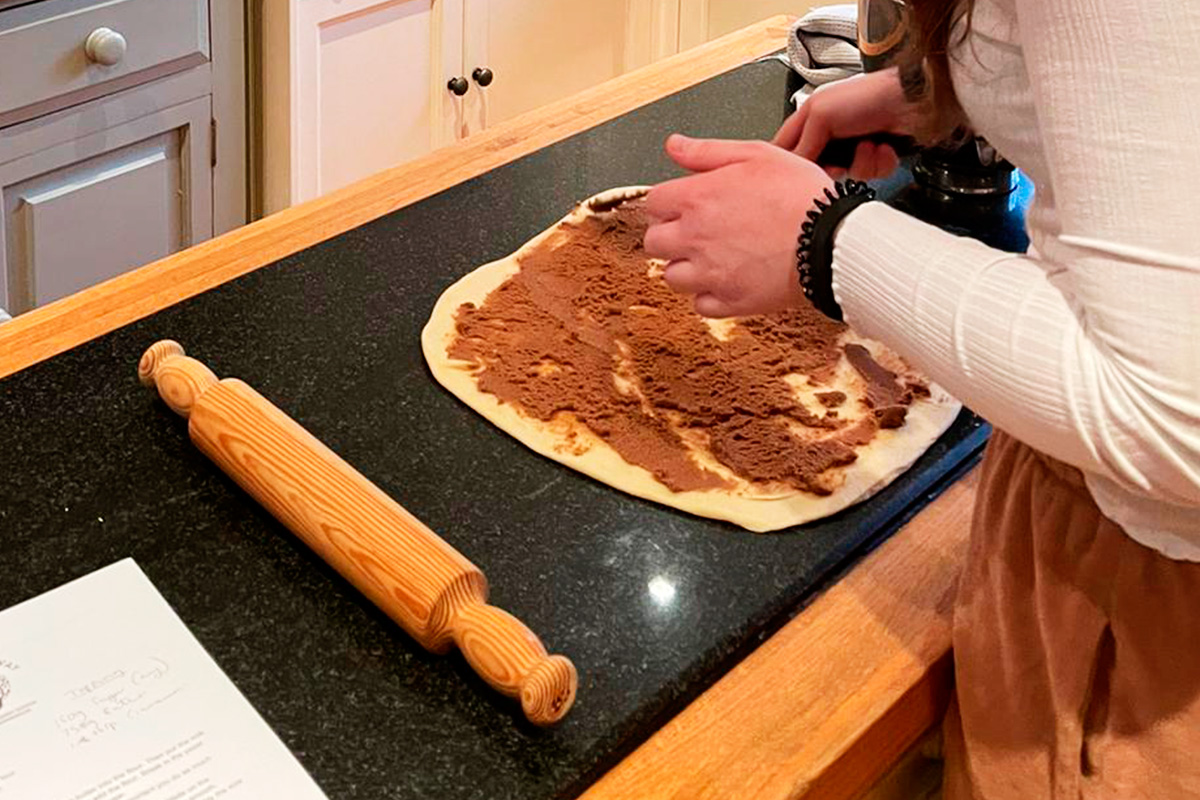
Our recipe for cinnamon twists is always a really popular addition to our Scandinavian Cookery or Baking courses. Rather than creating loads of really thin laminations to create a croissant or “cro-nut” style pastry, our version is less energy and time intensive, so you can get them in the oven (and onto your plate) sooner. Here’s a step-by step guide to folding and plaiting them to create those delicious little knots.
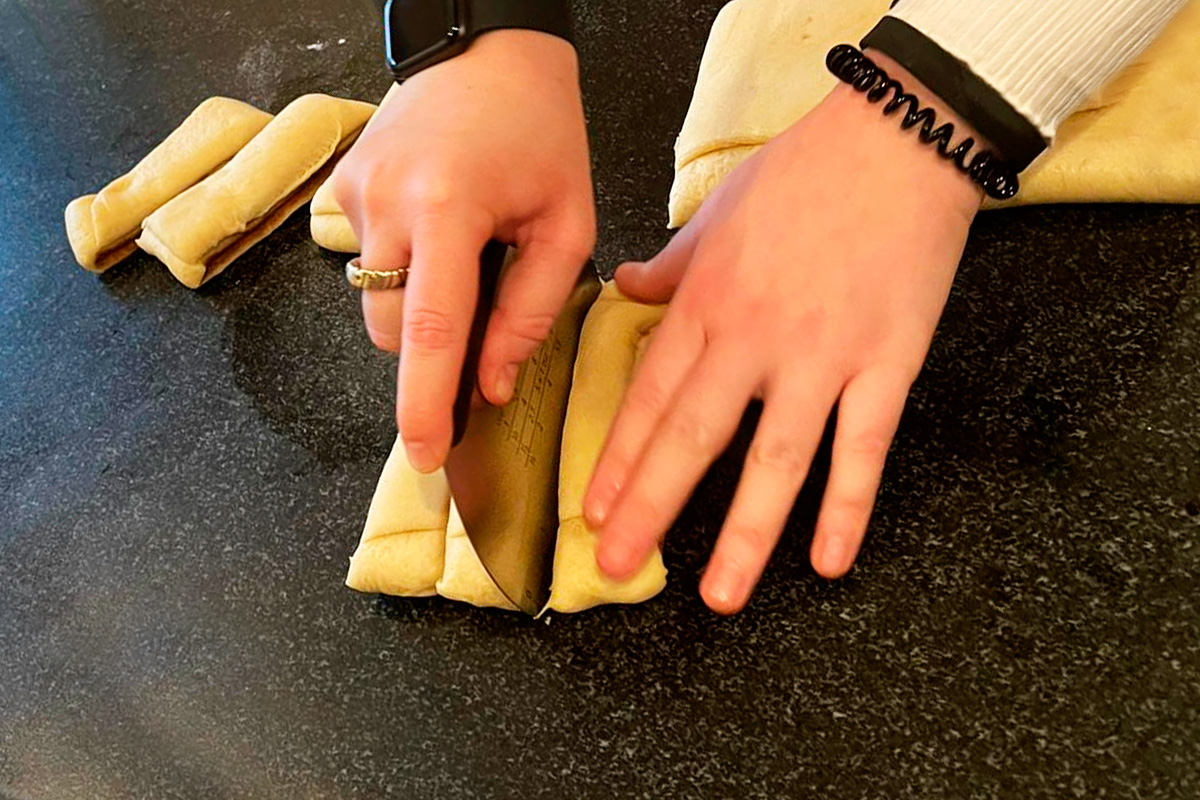
Once you have rolled out your enriched dough (to about the size of a piece of A3 paper) and spread the cinnamon paste over it (see recipe here), take one of the long edges and fold it 1/3 over. Then fold the other 1/3 with exposed paste over on top of the doubled-up layer, so that you have a long, thin rectangle. Slice this into 24 strips, approximately 3.5cm wide.
Use a sharp knife to cut two lines down each strip to create three strands, starting 1-1.5cm from the top
Plait the three strands together by taking one outer strand and crossing it over top of the middle one, then repeating from the other side, and alternating.
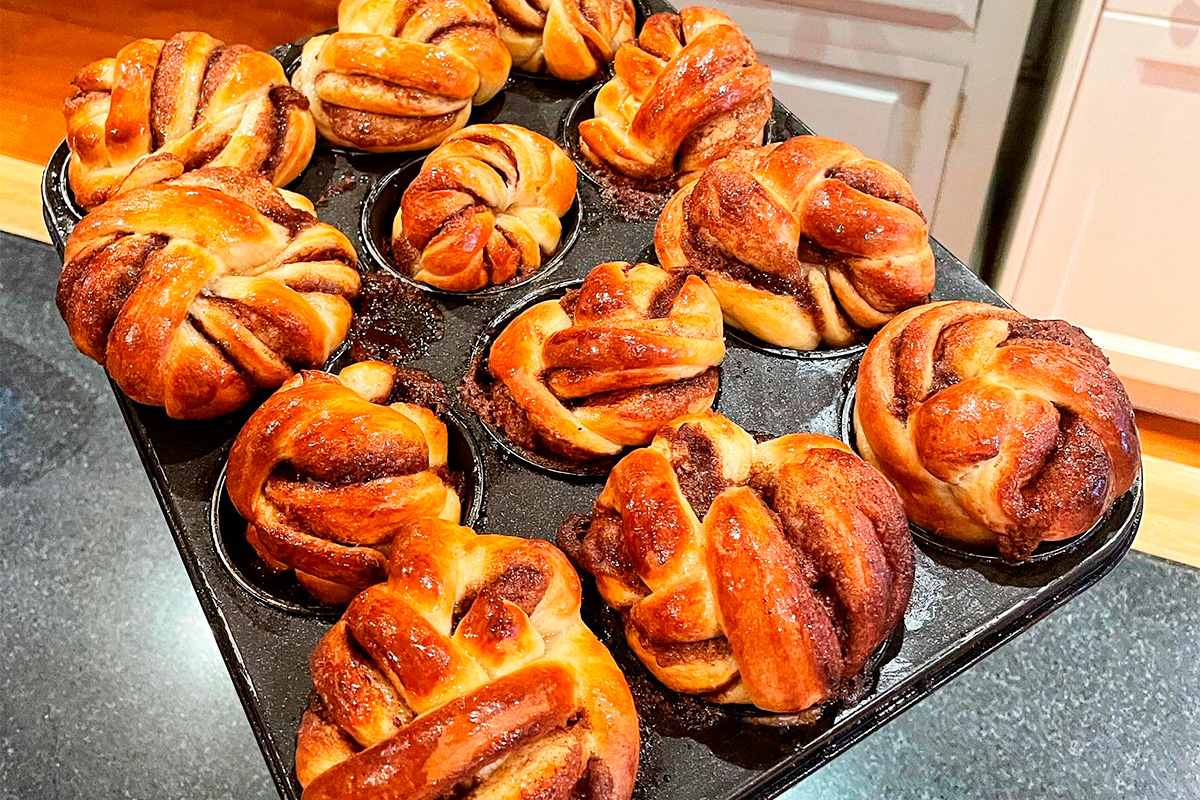
Roll the plaited dough up into a ball and place in a greased muffin tray, then repeat until you have plaited all 24 twists.
Having manipulated your dough so much, you then need to leave it to prove again for fifteen minutes to half an hour before baking, so that the dough can relax and expand into its new shape. Then bake!
At the start of last year, during that third lockdown that we’d all rather forget, Lori of restaurant and recipe blog mybossbuysmelunch and her Mum joined one of our online enriched dough courses for a day of stay-at-home baking.
“I ate three in ten minutes and I’m totally on board with that. So damn good I am going to have to ration how many times I make these!”
Lori shared the recipe for our cinnamon twists with her followers shortly after, and it’ll come as no surprise to anyone that they proved mighty popular. We thought it only fair then that we share her write-up with everybody else too!
INGREDIENTS
200g Full Fat Milk 2 Medium Eggs 600g Strong White Bread Flour 12g fast action yeast 50g caster sugar 10g Salt 200g unsalted butter at room temperature For the filling: 150g soft brown sugar 75g unsalted butter at room temperature 2 tbsp ground cinnamon For the glaze: 50g caster sugar dissolved in 2 tbsp water to form syrup
METHOD
In a stand mixer with a dough hook, mix together the butter & flour until well combined then add the sugar, salt & yeast. Whisk together the milk and eggs then add to the stand mixer & bring together for circa 5mins until the dough has formed a ball. Once happy place the dough in a bowl, cover with a clean tea towel and leave to prove for 2-3 hours until it has doubled in size.
Then, lightly flour a surface & roll the dough into a rectangle (30 x 25cm). For the filling, beat the butter & sugar together until a smooth paste forms & add cinnamon. Spread the filling over the top of the dough.
With the long side of the dough facing you, fold a third across towards the middle and repeat on the other side to enclose the filling. Then slice width-ways into 12 even strips. Next, use a sharp knife to cut down the middle of each strip leaving an inch in tact at the top. Twist the two strands together and then roll up to stand on the flat end. Grease a 12-cup muffin tray and pop the knots into the tray, leaving them to prove for 15mins.
Preheat your oven to 200°/ 180° fan. Brush the knots with egg glaze and cook for about 15 mins (our oven is super hot and only took 11, so check!). Once cooked and still hot, brush the knots with sugar glaze and leave to cool slightly before tucking in.
Saffron buns are a traditional Cornish teatime treat – a rich yeast bun not dissimilar to a teacake, only better! Saffron is the world’s most expensive spice by weight, so how did it end up being a key ingredient in Cornish baking? Spices such as saffron were often landed in Cornwall, both legally and illegally, with records showing that it was once traded with the Phoenicians for tin and copper. The county’s mild maritime climate also made it one of the few places in the UK where the crocus flowers that produce saffron could be grown commercially. It’s been a couple of centuries since saffron was produced commercially in Cornwall, however one farm is now growing it here on the Roseland Peninsula. With such ready access to saffron, it was baked into revel buns on special occasions with so much being used that it gave the buns a characteristic yellow colour. For the past hundred years it’s been prohibitively expensive to use that much saffron, so many bakers used food colourings to turn their buns yellow. This recipe that I recently baked for Rodda’s Cornish Clotted Cream uses a decent pinch of saffron and clotted cream to create a rich, spiced, teatime treat. Enjoy!
INGREDIENTS
300ml whole milk Large pinch of saffron 50g Rodda’s clotted cream, melted 2 tsp mixed spice 550g strong bread flour 1 tsp fine sea salt 80g caster sugar 1 x 7g sachet fast-action yeast 100g sultanas/currants 4-tablespoons of milk For the glaze: 50g caster sugar 2 tablespoons of water
METHOD
Gently heat the milk with the saffron in a small pan until it’s steaming. Add clotted cream to the saffron-infused milk and return to a low heat for 2-3 minutes. Gently whisk until melted and combined.
Take the mixture of the heat and allow to cool until it is warm to the touch
Sift the flour into a large bowl and stir in the salt, spices, sugar, and yeast.
Make a well in the centre of the dry ingredients and pour in the warm milk. Mix and bring together into a soft dough. Knead on a slow speed in a free-standing mixer with the dough hook attached for 7-10 minutes, or slap and fold a few times to bring it together. After 5 minutes, incorporate the currants. To check if the dough is ready, when the dough is touched it should bounce back.
Cover the bowl and leave in a warm place for 45-60 minutes or until doubled in size. Knock back the dough and turn out onto a floured surface and knead briefly.
Divide the dough into 10 equal portions to make buns and place on a lined baking sheet.
Cover the buns and leave to prove again for 30 minutes.
Preheat the oven to 200°C, fan 180°C, gas mark 6. Then brush the top of the buns with a little milk and bake for 20 minutes until golden.
Once the buns have baked, its time to make the glaze. To make the glaze – put 50g of caster sugar and 2 tablespoons of water in a saucepan. Gently heat until the sugar has dissolved and then boil for 1 minute. Then brush the mixture over the warm buns and transfer them to a wire rack and leave to cool.
Slice in half and enjoy the buns fresh or toasted, spread with more clotted cream.
On July 9th Great British Bake Off 2020 quarter finalist Marc Elliot will be joining us at Philleigh Way for the first of his baking courses. Marc’s an incredible baker with a particular passion for dough, and as well as sharing his knowledge of bread and enriched doughs, he’ll also be teaching attendees how to make everyone’s favourite Portuguese pastries, pastéis de nata.
Marc lives just up the road in Padstow, by way of Leicester and latterly Sheffield where he was previously a fixture of the Peak District climbing scene. A talented climber, he started surfing when he moved to Cornwall, where he has worked as a support worker, a bronze resin sculptor and photographer. In 2016 Marc was involved in a motorcycle accident and was injured so badly that his left leg had to be amputated above the knee. Whilst rehabilitating he discovered baking and a talent turned into a passion that led him to the iconic GBBO tent. Last summer Marc was one of 12 contestants who formed a bubble with the cast and crew of the hit Channel 4 series for seven weeks so that the competition could go ahead despite the pandemic. He made it as far as the quarterfinals, picking up fans and garnering a huge amount of support along the way. Last year’s series was Bake Off’s most popular yet, attracting a peak audience of 10.4 million viewers – partly perhaps because of the explosion in the popularity of baking and the sourdough trend through 2020s lockdowns. I’m really excited that Marc’s going to be leading some special courses as a guest tutor, and can’t wait to welcome him to the cookery school.
Marc, you shot to fame when you reached the quarterfinals of the Great British Bake Off 2020. What was your journey to the famous Bake Off tent? It started four years ago after my accident, because of a need to do something as I was incapable of climbing or surfing, or going out and wandering the moors taking photographs like I was used to doing. I needed something to challenge myself with and stimulate my mind whilst I was still in a wheelchair. One day I thought to myself “I’m going to start baking bread”. It turned out really well and I found that it was really calming and helped the anxiety/depression/PTSD – whatever you’d call what I was experiencing at that time. It grew from there into a hobby and then a passion. My daughter’s always been a big fan of The Great British Bake Off and for the last few years has been saying that I should apply. Last year, just to keep her quiet, I applied and lo-and-behold, I got on!
Considering your creative background [Marc’s also a resin sculptor and photographer] why did you choose baking bread as opposed to another activity such as painting to help your rehabilitation? I suppose it wasn’t really an obvious choice, and wasn’t an area that I thought I’d ever go into, coming from a very active background as a climber and surfer, and channeling my creativity through photography. But, after the accident, my whole world was pretty much ripped apart and turned upside down. Although I didn’t have the physical or even mental capacity to even think about going climbing again, or wandering the moors, I still needed something. I’ve always had a very busy mind and I need to challenge myself and it was just by chance that one day I decided to bake some bread and it lit a spark. It developed slowly at first, it wasn’t an immediate thing, but it grew to be something that I’m very passionate about. Baking’s here to stay!
GBBO covers so many different disciplines within baking. What did you think were your strengths and weaknesses going into the competition? Did any of your bakes surprise you? Certainly my strength was bread. That’s the thing I’ve had most experience in and the area I’m the most comfortable with. My weakness was and probably still is, cake. I can bake cakes but I wouldn’t describe myself as a great cake baker because I don’t really have the patience to finely decorate cakes as many people can. I can bake a cake and it’ll taste good, but going into the competition it soon became apparent in week one with the failure of the David Bowie cake, that cake wasn’t going to be my strong point! I say that cake’s my weak point but on week four when I made the white celebration cake, that really did surprise me because I panicked a bit and changed it right at the last minute. I made that on the day without practicing. It was a completely new idea and it turned out well. Also the ice cream cake, that surprised me as well. The judges really liked that.
Were there any bakes in particular that you were hoping would or wouldn’t come up? Not really, but I suppose the one technical bake that I was the most disappointed with was when we were asked to make éclairs on pastry week. That particular day was incredibly hot – I was on my knees with the pressure and the heat and my mind just went blank. That whole bake was pretty much a disaster – my choux pastry was awful and the crème patisserie was too! I wasn’t particularly worried about that challenge turning up, but I was disappointed with my performance when it did.
What is it that you enjoy so much about working with dough? You’re working with so few ingredients – with sourdough you’re only working with three ingredients! I like using the best ingredients and then it comes down to the importance of being really methodical, being patient, and having good judgement when working with dough and yeasts and cultures and ferments. That part of it fascinates me. I enjoy the science, and making those judgements is something that I find quite therapeutic.
What’s the best tip that you picked up from Prue, Paul, or any of your fellow contestants? Going back to pastry week when I did the éclairs, Prue gave me a really good tip, which I do every time I make choux now. That was to take them out ten minutes before they’re cooked, then pierce the bottoms, turn them upside down and cook them for the final ten minutes. You then leave them in the oven with it turned off and the door slightly ajar. They’ve been coming out amazing – so I think that’s a really great tip. When you pierce the bottom and turn them upside down that lets all the internal steam out so you get a really nice, crisp and dry choux shell.
What advice would you give to any enthusiastic home bakers? For me, it’s about being methodical. Get it all planned out. Read the recipe, get all of your ingredients out and weigh them out, and just be organised. I think that really helps. Also, just follow trusted recipes. Unless you’re designing your own recipe, follow a recipe that you know people have made and had good success with. I’ve found there are a lot of dodgy recipes on the internet! Find a trusted baker and use trusted recipes. I think it’s important to know and expect that you’re going to fail sometimes in baking, that’s par for the course. Try not to get frustrated with that and use it as a period for learning rather than for berating yourself. As a self-taught baker I made a lot of mistakes and still continue to do so, and I have to remind myself to use that as an opportunity – which is easier said than done, sometimes! Finally, enjoy the process. Often I think that one bakes wanting to get to the end and see the final result, but I think that enjoying the process from the start to the end is a really important piece of advice also.
What skills and recipes are you looking forward to sharing on your courses at Philleigh Way? I’m looking forward to sharing my brioche croissant and pastéis de nata recipes. They’re really good recipes. The pastéis de nata are such amazing little tarts but they’re quite involved to make and I’m looking forward to sharing those skills and seeing what people can make with those.
Cornwall’s a county with its fair share of signature baked goods. As an adopted Cornishman, what’s your favourite and why? I think it has to be the pasty. Cornwall’s got lots of good bakes, from saffron buns to clotted cream cakes and things like that, which are all nice, but I think that for me, it’s hard to beat a really good Cornish pasty.
Marc’s Baking Courses will be taking place on Friday the 9th of July and Saturday the 18th of September. To join him for the day, click here:
It’s officially baking season. Baking and pâtisserie is a branch of cookery that often borders on science, demanding attention to detail and patience to perfect. Few people are as dedicated to the craft of patisserie as pastry chef and 2018 Bake Off: The Professionals finalist Darryl Collins. We’re fortunate to have Darryl regularly share his knowledge and skills as a guest tutor at Philleigh Way, leading our Patisserie Masterclass course. We sat down with him to find out more about pastry and pâtisserie ahead of his next course on October 31st.
My theory to this is that to be a good pâtisserie chef you need to have an artistic level of thinking with a scientific mind. You need to look at the ingredients at a molecular level and not just as something that you use to hold things together.
I honestly believe that anyone can become a decent pastry chef with the right training and guidance but I don’t believe that anyone can just become a great pastry chef by accident. I’ve been a pastry chef for over 20 years and have also worked with many chefs and pastry chefs over those years – some extremely talented chefs and others that seem to just be doing it for a job. With pastry, it has to be a career choice. It has to be something you absolutely love and live for; there is no in-between.
For hobbyist bakers, I think I’ve already proven that you can do fine patisserie at home as well as in a professional kitchen. Since lockdown I’ve been running Yumii Pâtisserie from home and I was still able to create cakes, éclairs and so on. It’s about persistence in what you’re doing and trying different techniques. Hobby-wise, you’re looking on Instagram and other places like that for inspiration and then putting recipes together and playing around with them until you achieve what you’re looking for and what you think is right.
My advice to home bakers looking to take it up a notch is to see if you can get into a professional kitchen. Not all kitchens will allow non-professionals to go in and check out that side of things, but some will. You can always approach a kitchen to see if you can get some experience. Or, courses! You can go up to Ruth Hinks’ in Scotland at Cocoa Black because they do lots of courses, there’s a place in Banbury at Callebaut Chocolate where they have a Chocolate Academy. I’m obviously teaching a patisserie masterclass at Philleigh Way if people want to come and hone their skills, and we normally do that three or four times a year. These things aren’t free, but they’re the best way that you can pick up professional skills as a home baker.
The key elements to pâtisserie, as with all food, are taste, flavour, texture and looks. These are a must as several senses are involved – we eat with our eyes too!
Taste and flavour are probably of paramount importance. I’ve eaten in quite a number of restaurants and hotels and I would say that perhaps 70% of the desserts I have eaten have been of a poor quality. This is simply because they have been a case of style over substance, and something looking great on a plate but then tasting of nothing but sugar. I work on the flavours first and trial them with many different people well before I start to think about what it will look like on the plate.
The importance of texture is for mouth-feel, not so much for looks. When it enters the mouth it obviously can’t be grainy, it’s got to be smooth and pleasant so that you don’t think “hmm, what is that in my mouth?” Everything has to blend together. Texture is so important, not so much for your hands but
How something is plated and presented is highly important, even though it is something that is so often overlooked. We eat with our eyes first, then we get the aroma, and finally the taste.
These are the only guides a pastry chef needs to understand to be successful and to have a good understanding of patisserie. Knowledge is the key to all. If you want to do this for a living then train hard, listen to others but most of all be true to your passion and yourself. Then over time you’ll be able to excite people with your flavours and impress with your talents and skill as a pastry chef. The same goes for home bakers who want to wow – patisserie is a craft that you need to spend time learning.
On the next Patisserie Masterclass that I’ll be teaching at Philleigh Way at the end of October, I think that because it’s Halloween we’ll be doing something along that theme. We’ll make some pumpkin macarons, and we’ll do some choux buns – probably again with some sort of Halloween theme! That way I can teach some high level skills, but we can have a bit of fun with it all at the same time.