Although it’s looking a little bit brighter outside, we’re definitely still feeling the cold. What better way to warm up than with simple homemade frik soup!
Here we have a “Rupert Recipe”, a Philleigh Way version of Algerian frik soup, usually made with lamb or beef and cracked green wheat, we have made this ‘everyone friendly’ with no meat, just veg, and bulghar wheat.
Ingredients
1 Medium Red Onion 2 garlic cloves Thumb sized piece of ginger 400g tinned toms 1 cup Chickpeas from water Fresh Coriander handful chopped Fresh Mint handful chopped 1 tsp Smoked Paprika 1 tsp Coriander ground 1 tbsp Tomato Puree 2 tsp red wine vinegar 1/2 tsp Ground Cinnamon 4 tbsp Fine Brown Bulgur wheat Dukkah to finish
Method
Chop onion, garlic and ginger. Place it in the large pot over medium heat with 2 tbsp of olive oil. Season. Then sweat for 7-9 minutes.
Add paprika, coriander, tomato paste, cinnamon and a pinch of salt and pepper. Sweat for a further 5 minutes. Add the vinegar.
Add chickpeas and let it cook for another 5 minutes. Follow with the tomatoes and add hot water just to cover all of the veggies, then add the bulgar wheat. Season.
Make sure all the ingredients are covered with water (add more if necessary). Let it cook for a further 15 minutes on a medium heat.
Roughly chop fresh coriander & mint, add and stir through. Serve, sprinkle with dukkah and enjoy with flatbreads (find our flatbreads recipe here).
The simple addition of truffle has the power to transform dishes across the culinary spectrum. I recently teamed up with the team at Truffle Hunter to develop a series of beautiful truffle recipes for you and your guests to enjoy.
This latest recipe is a truffle twist on cacio e pepe, a simple and highly celebrated dish in Italy and beyond. Buon appetito!
Cook the pasta in salted boiling water, for 2 minutes less than the pack instructions state. Meanwhile, melt the butter in a medium frying pan over a low heat, then add the ground black pepper and toast for a few minutes. Drain the pasta, keeping 200ml of the pasta water. Tip the pasta and 100ml of the pasta water into the pan with the butter and pepper. Toss briefly, then scatter over the parmesan evenly, but don’t stir – wait for the cheese to melt for 30 seconds. Once melted, toss everything well, and stir together and keep cooking. Add a splash more pasta water if you need to, to loosen the sauce and coat the pasta. Serve immediately with a good grating of black pepper, drizzle of truffle oil, and more parmesan. (Optional) For an extra special touch, shave some fresh truffles over the cacio e pepe just before serving.
If you’re after hearty and warming food for the winter months, then look no further than Scandinavia. When you think of Scandinavian food, you probably think of three things – “fika” or “sweet treats” like cinnamon rolls and semlor buns, rollmop herrings, and…. the meatballs made famous by a certain Swedish furniture store. On a stormy night in the depths of winter, or on the rare occasion that it snows here, there is nothing better than a bowl of fluffy mash topped with juicy, lightly spiced Swedish meatballs and covered in creamy gravy.
Here’s how to make your own, and if you fancy getting even more familiar with the amazing and celebrated regional cuisine of Sweden, Norway, Finland and Denmark, then join us on our next Scandinavian Cookery Course.
Ingredients
300g pork mince
300g beef mince
15g butter
1 tbsp plain flour
½ tsp allspice
200ml chicken stock
175ml cream
A squeeze of lemon juice
A splash of Worcestershire sauce
Pinch of salt and ground black pepper
Small handful fresh dill, chopped
Potatoes for mashing (russets are a good choice)
FOR THE PICKLED RED ONION
1 red onion, thinly sliced
1 tbsp white sugar
1 tsp salt
125ml cider or white wine vinegar
Method
To Make Pickled Red Onion
Combine 1 tablespoon of white sugar with 1 teaspoon of salt in a bowl with 125ml cider vinegar and 250ml water. Mix until dissolved. Place the thinly sliced red onion in a mason or kilner jar, pour the liquid over, then seal and leave to stand for 1 hour.
To Make Swedish Meatballs
Peel your potatoes and put in a pan of boiling water to cook for 12-15 minutes until easily pierced with a knife.
Meanwhile, combine the pork and beef mince in a bowl, season, and work together well with your hands to break down and combine the mince. Roll into small balls about the size of a golf or squash ball.
Heat a glug of olive oil in a heavy-based frying pan (one with a lid, for later) over a medium-high heat, and brown the meatballs all over. Colour equals flavour! Remove with a slotted spoon and set aside.
Turn down the heat to low-medium, add 15g butter to the pan and whisk until melted. Whisk in 1 tablespoon of plain flour and the allspice, then cook until it starts to smell toasty.
Gradually add the chicken stock and cream (although you can add the cream later if you like), whisking all the time, until smooth.
Return the meatballs to the pan, cover and simmer gently for 10-12 minutes or until cooked through. Season with a squeeze of lemon juice, a splash of Worcestershire sauce, a pinch of salt and a grind of black pepper.
Mash your potatoes with a splash of cream until smooth.
To plate up, spoon mashed potato onto your plate then place meatballs and a drizzle of the creamy sauce on top. Add some pickled red onion and sprinkle with a small handful of chopped fresh dill.
Winter is soup season, particularly the first few months of the new year when we get back into routines (and perhaps with a renewed focus on healthy eating) after the Christmas and New Year’s festivities. Whether for lunch or a lighter evening meal, soups are varied and versatile. Rather than buying or relying on tinned or carton soups, making your own is more rewarding, tastier, and a great way to save money or use up leftovers. Here are four Philleigh Way favourite soup recipes to try out over the coming weeks:
1 onion 2 sticks celery 1 carrot 1 fennel bulb 2 cloves garlic ¼ Leek 1 red chilli , deseeded 1 tbsp fennel seeds 1 Star anise 2 tbsp brandy/cognac (or red wine vinegar or small glass white wine) Thyme/rosemary Sprinkle of saffron (optional) 2 tablespoons olive oil , plus extra for drizzling 800 g chopped plum tomatoes ½ butternut squash or potatoes, peeled and finely cubed 500 ml organic fish stock 300g fish (skinned) from sustainable sources, ask your fishmonger
Finely chop the onion, fennel, celery, carrot , garlic, star anise, saffron and chilli. Peel the potato/squash and dice. Heat the oil in a large pan, add the veg and sweat gently until soft. Season. Add the wine/brandy/vinegar, tomatoes, squash and stock and bring to the boil. Cover and simmer gently for 30 minutes. Season and gently break up the tomatoes. Roughly chop the fish and add to the pan simmer for 5 minutes or until just cooked. Blitz. Taste the soup and season it again with salt and pepper and a squeeze of lemon if necessary. Serve drizzled with olive oil and sprinkled with the chopped parsley
4 tbsp extra virgin olive oil , plus extra to serve 1 onion , finely chopped 1 celery stick , cut into chunks 750g pumpkin or squash, peeled, deseeded and cut into small chunks 1 carrot , peeled and cut into chunks 3 garlic cloves , chopped 3 tbsp tomato purée 1.2l chicken stock or vegetable stock 75g farro or peal barley 50-80g parmesan rinds or vegetarian alternative (optional), plus a few shavings to serve 400g can cannellini beans , drained 2 handfuls baby spinach 2 tbsp chopped parsley or 8 whole sage leaves
Heat the oil in a heavy-bottomed saucepan. Add the onion, celery, pumpkin or squash and carrot and cook until the vegetables have some colour. Add a splash of water and some seasoning, then cover the pan and let the vegetables cook over a very low heat for 5 minutes. Add the garlic and cook for another couple of mins, then add the tomato purée, stock, mixed grains, parmesan rinds, if using, and some seasoning. Simmer for about 15 mins (or until the grains are cooked), adding the beans for the final 5 mins. In the last few mins, add the spinach, then taste for seasoning. If you want to use sage, fry the leaves whole in a little olive oil before adding to the soup. If you prefer to use parsley, you can just add it directly to the soup. Serve with shavings of parmesan and a drizzle of extra virgin olive oil on top of each bowlful. Remove the parmesan rinds and serve.
Two Cinnamon sticks 3 whole cloves 2 star anise 1 large white onion, peeled and quartered 3 garlic cloves 1 red chilli 4-inch piece of fresh ginger, peeled and halved lengthwise 2 vegetable stock or broth 4 cups water 2 tablespoons soy sauce 1 large handful rice noodles 1 tablespoon sesame oil 5 mushrooms Rice wine vinegar Asian Paste (optional) Garnishes Mung bean sprouts Sprigs of fresh basil (use Thai basil if you can find it) or coriander Sprigs of fresh mint Thinly sliced spring onions 1 Carrot (julienne) 1 Courgette (julienne)
Warm a medium soup pot over medium heat. Add the cinnamon sticks, cloves, and star anise and toast until fragrant, stirring occasionally, about 3 to 4 minutes. Add the onion, chill, garlic ginger, vegetable stock, water and soy. Raise the heat to high and bring the mixture to a boil, then reduce the heat as necessary to maintain a gentle simmer. Simmer for 30 minutes to give the flavours time to meld. In the meantime, prepare your rice noodles by cooking them according to package directions. Set them aside. To prepare the mushrooms, warm the oil in a medium skillet over medium heat until shimmering. Add the mushrooms and a few dashes of salt. Cook until the mushrooms are tender and lightly browned, about 4 to 6 minutes, then set them aside. Julienne your veg. Once the broth is done cooking, strain out the onions, ginger and spices (this is easiest with a small metal sieve, but you can also strain the mixture through a colander into another large bowl). Season it to taste with extra tamari and/or salt until the flavours of the spices really shine. Ladle the broth into bowls, add cooked noodles and mushrooms, and fresh garnishes to your heart’s content. Serve immediately, with chopsticks and soup spoon
1 large celeriac 2 onions 4 garlic cloves Veg or chicken stock cube 70ml double cream (or creme fraiche)
Peel the celeriac, then par boil until it can take a knife. Then light your BBQ and have coals and one log fired up. Smoke the celeriac indirectly at 180-200C for 45 minutes to an hour. While that is smoking…. Dice the onions and garlic, then sweat off in a deep pan and season. Once the celeriac has been smoked to your liking, dice and add to the pan along with the stock and then top up with boiling water just above the line of the veg. Simmer until everything is soft. Then blitz and add the cream. Season to taste and serve with crusty bread and butter.
If you’re looking for ideas for Christmas gifts for foodie friends or family, or if you’ve got a large group of people who you want to give Christmas gifts to, such as colleagues or team members, then biscotti is the perfect answer. Biscotti are twice baked almond biscuits that are dry and crunchy, often served with sweet wine or coffee to dunk in. They’re popular as a Christmas gift because of their festive flavours and the fact that they keep well for up to a month after baking. Biscotti originate from the Tuscan city of Prato (back in the 14th century), and the name means “twice baked”, but in Italy these biscuits are also often known as “cantuccini”. The dough is first baked as a log and then sliced up to make the oval biscuits, that are baked again to make them crunchy. Whether included as part of a festive hamper or given as small gifts to colleagues, nothing shows that you care like baking, and nothing’s easier to bake and gift at this time of year than biscotti. Give it a go, and get ahead for Christmas!
INGREDIENTS
350g plain flour, plus extra for rolling 2 tsp baking powder 2 tsp mixed spice 250g golden caster sugar 3 eggs, beaten 1 orange, coarsely zested 85g sultanas 50g blanched almonds 50g your choice of other nuts
METHOD
Heat your oven to 180C, 160C fan or gas mark 4, and line two baking sheets with baking paper. In a large bowl, mix together the flour, baking powder, mixed spice and sugar. Stir in the eggs and zest until the mixture starts forming clumps, then bring the dough together with your hands – it will seem dry at first but keep kneading until no floury patches remain. Add the fruit and nuts, then work them into the dough until evenly distributed throughout. Turn the dough out onto a lightly floured surface and divide into four pieces.Roll each piece into a thick sausage about 30cm long. Place two on each tray, spaced well apart as they will increase in size as they bake. Bake for 25-30 minutes until the dough has risen and spread, and feels firm. It should still look pale. Remove from the oven and turn it down to 140C, and place the baked dough on a wire rack until cool enough to handle. Use a bread knife to cut the dough on the diagonal into 1cm thick slices, then lay the slices flat on the baking sheets. Bake for another 30 minutes, turning them over half way through, until dry and golden. Remove from the oven and tip out on to a wire rack to cool completely, then bundle up and gift wrap, or enjoy a few yourself with a coffee or glass of desert wine to dunk in.
The weather may be suggesting otherwise, but we are firmly in autumn now, and autumn is mushroom season. I’ve been working with our friends at Truffle Hunter recently, the UK’s leading supplier of fresh truffle and truffle products, developing some recipes with their range of oils and condiments. This recipe for truffled mushrooms and lentils is a suitably hearty seasonal recipe (and it’s vegan, too).
Ingredients
1 tsp TruffleHunter Black or White Truffle Oil 1 tsp TruffleHunter Minced Black Truffle 1 large onion 2 cloves garlic 1 celery stick 1 carrot Handful of mixed fresh mushrooms 500g raw puy or green lentils (or pre cooked) 1 bay leaf 1 large glass red wine 1 vegetable stock cube Handful of fresh parsley
Method:
Add the TruffleHunter Truffle Oil to a pan and then finely dice the vegetables. Add these to the saucepan along with the bay leaf on a medium heat. Finely chop half the mushrooms and add to the pan. Season the pan well. After gently sweating the vegetables for 8 minutes, add the lentils, TruffleHunter Minced Black Truffle and stock cube. Next, add the red wine. Cook off the wine and then pour 1.5 litres of hot water into the pan. Gently simmer with the lid on until the lentils are soft. If using pre-cooked lentils, add a little liquid and cook until your desired consistency. Just before the lentils are cooked, roughly chop the rest of the mushrooms, heat another frying pan and toast the mushrooms in a little truffle oil and then serve on top of the lentils. Taste and adjust the seasoning. Sprinkle with parsley and enjoy with a glass of red wine!
Whether you call them cinnamon twists, rolls, scrolls or buns, the one thing that we can all agree on is that they’re delicious and one is never enough.
Our recipe for cinnamon twists is always a really popular addition to our Scandinavian Cookery or Baking courses. Rather than creating loads of really thin laminations to create a croissant or “cro-nut” style pastry, our version is less energy and time intensive, so you can get them in the oven (and onto your plate) sooner. Here’s a step-by step guide to folding and plaiting them to create those delicious little knots.
Once you have rolled out your enriched dough (to about the size of a piece of A3 paper) and spread the cinnamon paste over it (see recipe here), take one of the long edges and fold it 1/3 over. Then fold the other 1/3 with exposed paste over on top of the doubled-up layer, so that you have a long, thin rectangle. Slice this into 24 strips, approximately 3.5cm wide.
Use a sharp knife to cut two lines down each strip to create three strands, starting 1-1.5cm from the top
Plait the three strands together by taking one outer strand and crossing it over top of the middle one, then repeating from the other side, and alternating.
Roll the plaited dough up into a ball and place in a greased muffin tray, then repeat until you have plaited all 24 twists.
Having manipulated your dough so much, you then need to leave it to prove again for fifteen minutes to half an hour before baking, so that the dough can relax and expand into its new shape. Then bake!
Autumn is apple season. That’s come around quickly, huh! Some apple varieties are ready to harvest in August, but September and October are when the action really ramps up in the UK. But whilst we’re still also clinging on to the remains of summer, I’ve got a recipe for you that combines your barbecue with the first of the new season’s apples. And, if it’s raining, you can use your oven instead of your barbecue. You can make most of the elements of this dessert a day or two in advance too, so all you need to do when the time comes is cook your apples and assemble. Give it a go, and let me know what you think!
Preheat the oven to 200°C (180ºC fan). Lightly butter a deep baking dish. Add the Biscoff spread to a small pan and gently heat until runny. Take off the heat and leave to cool. Put the flour, butter and a pinch of salt to a medium sized mixing bowl and rub together with your fingers until resembling breadcrumbs. Stir through the sugar and broken biscuits and nuts. Then add the melted biscoff. Bake for 35-40 minutes until the crumble is golden brown. If preparing in advance, transfer to an airtight containter and refrigerate.
Whip together the two creams until combined and forming soft peaks then add vanilla and sugar. Put to the side or store in the fridge if preparing in advance.
In a small saucepan over medium heat, add sugar and salt and cover with coffee, topping up with water as required. Bring to a simmer, stirring every so often until sugar is dissolved (about 5 minutes). Increase heat to medium-high and cook until deeply golden, without stirring, (4 to 5 minutes more). Once the caramel is a deep copper colour, turn off the heat and immediately stir in the cream and butter. The mixture will bubble up so be careful! Let it cool slightly in pan, then transfer to a container to cool completely.
Preheat the oven to 180°C Line a baking tray with parchment paper. Toast the sesame seeds in a dry frying pan over a medium for a few minutes until they turn golden brown, giving the pan a shake every now and then so they don’t catch. Set aside to cool. Put the sugar, butter, golden syrup, and vanilla extract in a pan and heat over a low heat, stirring constantly, until the sugar has dissolved. Don’t let it boil! Then take the saucepan off the heat and tip in the toasted sesame seeds and mix well. Pour the mixture out onto the lined baking tray and spread it out evenly with the back of a spoon or spatula, pressing it down as you go. Pop that in the oven for about 10 minutes or until the edges are starting to brown and crisp up. Remove from the oven and place the tray on a cooling rack. If you want uniform pieces then once it’s cooled a bit score the brittle so that you can break it along those lines later, or just leave it to cool thoroughly and then snap into random shapes. You can sotre your sesame brittle in an airtight container in a cupboard for a week or two if you need to .
All of above can be done few days before you want to serve.
TO BRING THE DISH TOGETHER
Either fire up the BBQ or pre heat your oven to 190°C. Cut your apples in half, removing the seeds, and roast or bbq until golden brown and softened. You’ll probably want one eating apple per person. Put two halves of cooked apple and a dollop of the cream on each plate, sprinkle some crumble mixture over, stick a couple of bits of sesame brittle in the cream and then drizzle syrup over it all. Serve, and enjoy!
Known in Greece as “xoriatiki” (or “horiatiki”), which translates as “rural”, this salad is best kept simple and as intended. Super fresh in-season ingredients, tangy creamy feta cheese, and a simple dressing, it’s got texture and flavour by the bucket-load.
Ingredients
Cherry tomatoes (good handful, or 3-4 large tomatoes Cucumber Red onion (medium sized) Kalamata olives Feta cheese (200g-ish block) Oregano (fresh or dried) Extra virgin olive oil Red wine vinegar (you can add a green pepper too if you like)
Method
Halve the cherry tomatoes or cut regular sized tomaotoes into wedges, in the salad bowl so that the juices collect at the bottom. Cut the cucmber into thick quarters, and slice the red onion into thin rings. Add to the bowl with the olives, then add a good glug or two of olive oil and about a tablespoon of red wine vinegar. Gently stir and toss it all together to coat. The feta can be placed on top whole or in large slabs depending on how many people you’re feeding (quite traditional) or cut into large cubes. Just because feta crumbles doesn’t mean you crumble it into this salad – cut cubes are better! Incidentally, if you have a colleague or team mate, who crumbles under pressure but retains a decent sense of humour, feta makes for a great nickname 😉 Garnish with a sprinkling of dried oregano and one last drizzle of olive oil, and get stuck in.
Fancy mixing things up a bit? Try adding chunks of watermelon to this salad! You won’t regret it.
If you’re having this as a light lunch then a piece of crusty bread to mop up the dressing is borderline essential. It also goes great as a side with lamb koftas (recipe here).
If there’s one thing that unites us in the UK, it’s a love for drizzling or dolloping sauces over and alongside our meals. In fact, a poll commissioned by Waitrose last summer found that over a third of us have 5-6 jars or bottles of different condiments in their fridge.
As we hit peak summer, lots of us are also trying to find ways to utilise the crops from our veg patches and greenhouses. Last year a friend and I developed a recipe for an absolutely banging smoked chilli sauce that you can buy bottles of from the cookery school or Cove Café. We’re talking Cornish chillis that have been fermented for a fortnight, local apple cider vinegar, confit garlic, and smoking peppers, onions and tomatoes over cherry and oak wood. We went deep on this one!
If you can’t get your hands on a bottle before it all sells out, and if you’ve been growing chillies at home this year like our friend Matt (pictured), then I’ve got a simpler recipe for you to try so that you can put the fruits of your greenhouse or windowsill to good use and cook up a batch of this smokey chilli sauce. It’s incredible poured over…. absolutely everything.
PREP
Sterilising your jars or bottles Wash your jars and lids in warm soapy water and leave to dry on a draining rack – don’t touch the insides! You can dry the lids with a clean, dry, tea towel. Place the jars and lids in a preheated oven at 180c/160c fan/gas 4 for fifteen minutes. Remove, allow to cool, and use!
500g Chillis (a couple of handfuls, or about 20 chillis, but go steady if you grew Scotch Bonnets like Matt) 1 red onion 1 red pepper 1 yellow pepper 1 vine of cherry tomatoes 2 cloves of garlic Thumb-sized piece of fresh ginger (grated) 300g castor sugar 250ml apple cider vinegar 1 – 1.5l water (you can use half and half cloudy apple juice if you like) 1 bay leaf Rosemary – sprig Thyme – small bunch
METHOD
Whether you have a biscuit tin smoker that you can pop on your barbecue (see here for how to make one yourself) an offset smoker, or are keeping it as simple as a barbecue with a lid, smoke the chillis and garlic for an hour or two. If you have any fruit wood or shavings (apple or cherry) that’d be ideal. Whilst your barbecue is lit, char the peppers, onions and tomatoes. Remove the skin from the charred veg, and roughly chop with the smoked chillis. Put it all into a large pot or casserole, add the rest of the ingredients going easy on the water or diluted apple juice (start with a litre and add more later if required) and bring up to the boil. Simmer for an hour over a low heat. Season and taste to check – you can adjust the water, vinegar and sugar to get the balance you’re after. Blend it with a stick-blender or in batches in a food processor – you can keep it fairly rough or blitz it for a while and then push it through a sieve with the back of a spoon if you want a super smooth sauce. It’s up to you! Check the seasoning and balance one last time, allow to cool, then decant into your sterilised jars or bottles.Store in a cool cupboard for up to a couple of months, and once opened keep it in the fridge and use it with a week or two. Which won’t be hard.
St Ives Food Festival is always such a great weekend. Taking place in mid-May, this food festival on Porthminster Beach has the most incredible backdrop for the chefs lucky enough to be invited to demonstrate a recipe on the Asado Fire Pit stage.
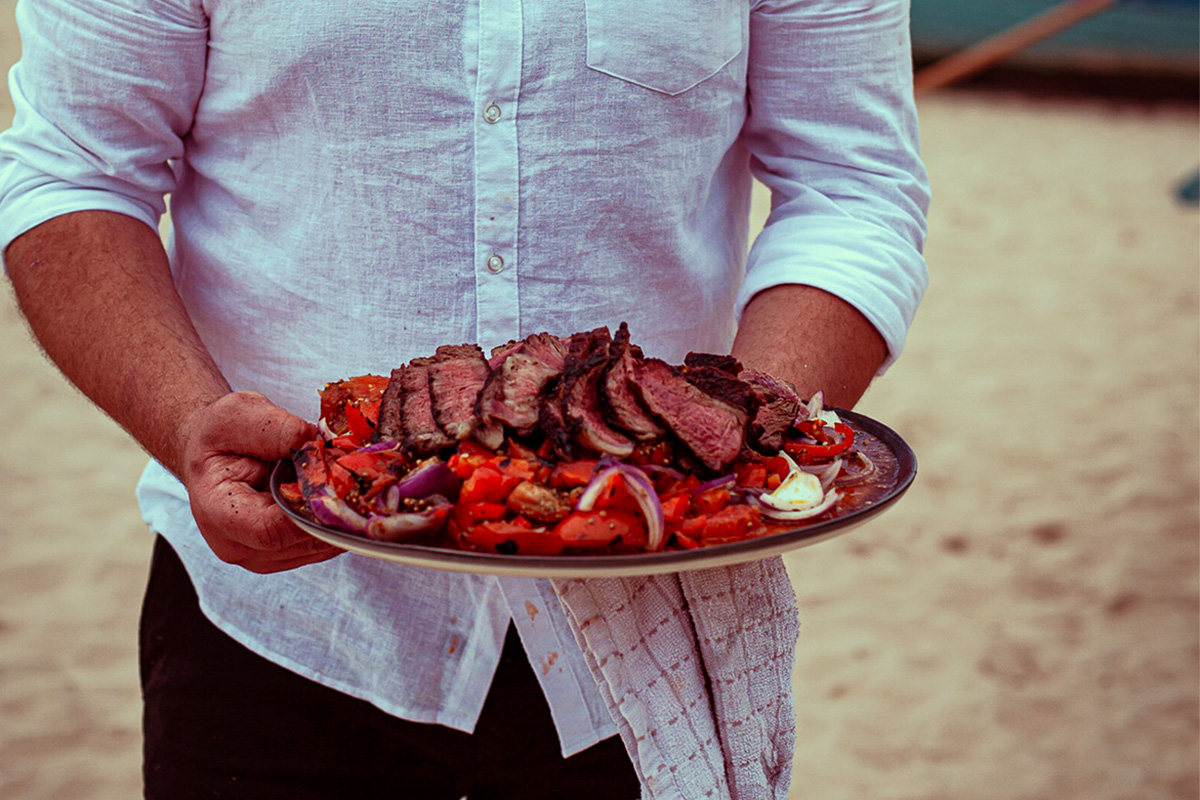
On Sunday 14th Rupert shared with the crowd how to make mechouia salad, a fantastic traditional Tunisian dish of grilled Mediterranean vegetables that goes incredibly with barbecued meats or works as a stand-alone dish. It’s a frequent favourite at our Wooodfired Cooking courses!
Mechouia (also known as slata mechouia in Tunisian Arabic) has a base of char-grilled tomatoes, onions, peppers, chillis and garlic, which are coarsely chopped and seasoned before being dressed with olive oil. Rupert cooked a tomahawk steak over the coals, serving it medium-rare, sliced over the mechouia.
Cook your steak to your preference, remembering to oil your steak (whether or not you use a pan) and, once placed on the grill, not to move it until you come to turn it. And, of course, rest it before slicing and serving!
Here’s how to make the mechouia to serve it on:
Ingredients
4 Medium Tomatoes
2 Red Peppers
2 Large Jalapeno Peppers
2 Small Onions, the outer paper leaves removed
1 Teaspoon Caraway Seeds
½ Teaspoon Coriander Seeds
2 Cloves Garlic, finely minced
¼ Cup Extra Virgin Olive Oil
1 Tablespoon red wine Vinegar
Salt and Pepper to Taste
Method
Using either a grill or BBQ fire, char the outsides of the tomato, peppers, and onions until they’re completely blackened and blistered, turning frequently to char all sides. You can put the onions directly into the coals of the fire. Place the vegetables in a large bowl and cover with plastic wrap to allow them to steam in their own heat for 15 minutes.
Peel the char off of the vegetables, coarsely chop them and place them in a bowl.
Toast the caraway and coriander seeds in a dry pan for a few minutes until they become fragrant. Grind them into a powder in a spice grinder or a mortar and pestle.
Add the spices with the olive oil and vinegar to the chopped vegetables and stir well. Salt and pepper to taste.
Header image by Nik Read, article images by Sam Buckle. Thanks to both for sharing their work with us.
We recently welcomed the team from our Roseland near-neighbours Wild Cornwall to Philleigh Way, to work on some summer recipes utilising their range of seasonal foraged and homegrown condiments, oils, vinegars, relishes and rubs. First up, spatchcock sweet chilli chicken!
This dish of whole barbecued sweet chilli chicken, wedges and coleslaw is perfect for cooking and eating outside now that the sun’s come out, but you can just as easily make it in your kitchen (then carry it outside to eat). It uses Wild Cornwall’s punchy Rambler’s Sweet Chilli Sauce that features Calendula flowers for an earthy flavour to add balance and depth, and foraged water pepper (Arsesmart) for a hot and peppery punch.
INGREDIENTS
Wild Cornwall Rambler’s sweet chilli sauce Whole medium chicken White potatoes Half red onion Half a white cabbage Half a red cabbage Vinegar (red or white wine vinegar) Plain natural yoghurt Mayonnaise Coriander leaves (optional) Spring onions (optional)
METHOD
For The Coleslaw Finely slice half a red onion Season with salt and pepper Add some vinegar to reduce the acidity of the onions Slice the red and white cabbage Add Wild Cornwall Rambler’s Sweet Chilli sauce Add the yogurt and mayo Give it a mix and that’s your coleslaw done Here you could add coriander or spring onions as extras.
To spatchcock the chicken with a pair of scissors or secateurs for reduced cooking time, cut alongside the back bone from one end to the other and the same on the other side. Turn it over Give it a push down Season with salt Brush on wild Cornwall sweet chilli sauce Put the chicken in a barbecue with a lid, or the oven Leave to cook for an hour and a half to two hours Keep basting with the sweet chilli sauce
To check the chicken is done either use a thermometer or check the juices run clear when pierced with a sharp knife in the thigh.
Cut the potatoes in wedges and par boil for 10-15 minutes. Drain and give them a little shake to rough up the outsides. Preheat a roasting tray with a slug of oil, then spreads out the wedges and put in the barbecue or oven to cook and crisp up.
Cooking with children is a great way to help them to develop a healthy relationship with food. When they’re young they don’t have to be involved from start to finish – just the fun messy bits that they’ll enjoy! This recipe for lentil and beef meatballs with pasta is a healthy one pan meal that the kids can help make, and that the whole family can enjoy. Give it a go!
INGREDIENTS
400g can green lentils, drained 400g good quality beef mince 1 onion, finely chopped 1 celery, finely chopped 1 carrot, finely chopped 1 tsp dried mixed herbs 3 cloves garlic, crushed 1 tbsp olive oil 400g chopped tomatoes 2 tbsp tomato paste 400g small pasta shapes, like orzo or macaroni 30g Parmesan or other hard cheese (Optional) fresh parsley to serve
METHOD
Start by chopping all of the vegetables before making your meatballs.
In a bowl add the mince, lentils, mixed herbs and season. Then squash and combine the mixture (get the kids involved! They can’t break it!) until it become smoother. You want to really work the mixture to mash it all together so that the meatballs don’t break apart when cooking.
Form meatballs the size of a ping pong ball and add to a large high sided cold casserole pan. Once they have all been shaped, put the pan onto a medium high heat, and brown the meatballs on 2/3 sides. You may need to cook them in batches. Don’t move them too quickly!
When they have coloured nicely remove from the pan to a plate, turn the heat down to medium and add the veggies. Gently sweat off for 4-6 mins, then add the tomato puree. Add the chopped toms, rinse out the can and fill with hot water and add to the mixture. Stir in the pasta and then add the meatballs back in.
Simmer with the lid on gently for 12-15 mins or until the orzo is cooked ( you can top up with water if needed).
Serve with a generous grating of cheese and a sprinkling of chopped parsley.
One billion people around the world rely on fish and seafood as their primary source of protein, with 3.3 billion getting at least 20% of their animal protein from fish. Fish and seafood are incredibly important not only for people’s diets but also for many people’s livelihoods, however the scales of sustainability aren’t always balanced and so sources and stocks need to be carefully managed and we need to consume consciously if we are to avoid catastrophic collapses. This recipe is all about helping you to do that – it’s a quick and delicious meal using tinned sardines that ticks the boxes for great value, sustainable and local fish.
Cornish Sardines and Pilchards
Cornwall has a long history of fishing for pilchards – small silver fish that we now call sardines that are caught as shoals in inshore waters. Historically, fishing boats would row out and lay a large wall of netting around a shoal of fish and then draw it in. The catch was then pressed for oil and the fish salted and laid in barrels for transport in the fish cellars that can be found in so many of Cornwall’s old fishing villages. These days fishing boats encircle the shoals with a ring net (a modern take on a purse seine net). How sustainable sardines are depends on where they are caught, but one of the most sustainable fisheries where fish stocks are actually increasing, is the Cornish fishery that catches fish in the Celtic Sea and English Channel. According to Cornwall Good Seafood Guide there are 14 vessels (all under 15m) fishing for sardines in Cornish waters. All of these boats belong to an organisation called the Cornwall Sardine Management Group and through this the Marine Stewardship Council has accredited the fishery. CEFAS (Centre for Environment, Fisheries and Aquaculture Science) carries out a survey every year and stock levels of sardines in our area appear to be healthy and improving.
The Benefits of Tinned Fish
Fish, particularly oily fish such as sardines, are a great source of heart-healthy omega-3 fatty acids as well as protein. Tinned or canned fish provide just the same amount of these and have the same nutritional values as fresh fish. The benefit of canning fish is that they have a really long shelf life. The fish are processed then sealed in an airtight can, sometimes in a sauce, and the can is heated to make it sterile which also cooks the fish. Tinned fish can have a shelf life of anywhere between 1-5 years and can be eaten straight of of the tin or used in a recipe like this.
Tinned Sardine & Tomato Pici Pasta
Ingredients
200g semolina flour 100ml warm water
OR
Pici pasta (or any string pasta)
1 tin of Cornish Sardines (or any MSC certified tinned oily fish) Handful of cherry tomatoes 1 pinch of chilli flakes 3 cloves of garlic ½ tsp dried oregano 1 tbsp red wine vinegar Fresh basil
You can use shop-bought dried linguini or spaghetti. But if you want to make the pici, in a bowl weigh 200g semolina flour, add a pinch of salt and drizzle of olive oil then pour in 100ml of warm water. Combine and then begin to knead until pliable and soft like playdough. Wrap and put into the fridge for at least 30mins. Without adding any extra flour, roll the dough out into a 1cm thick round. Next, cut the dough into ¼ inch thick strips. Make the Pici – One at a time, roll each strip out on a clean work surface to resemble thick spaghetti. The pasta needs enough grip to roll so don’t add any flour or you won’t be able to roll it out. Place each piece of rolled out pici on a tray or separate area dusted with flour or semolina to stop them sticking
Heat a saucepan or high sided frying pan. Then with a little veg/rapeseed oil put the cherry tomatoes in. You’re looking to blister and burn them! Don’t be shy. While they are frying, finely chop the garlic When the tomatoes are nicely charred and beginning to break, turn the heat down, drizle a little olive and add the garlic. Season. Add the tinned sardines, oregano and vinegar. Gently simmer for 7-10mins. Season with black pepper and the chilli flakes. The sardines will provide enough saltiness. Boil your pasta until al-dente then add that to the “sauce” with a little pasta water. Cook and incorporate. Serve with torn basil leafs and pangrattato. Enjoy!
Menu planning has never been more important, or necessary. Sure, in winter we all spend more evenings at home and each January many of us make commitments to eat better or scrutinise and experiment with our lifestyles, but as we start 2023 with a cost of living crisis, it’s a great way to eat well, for less.
As with the one week meal plans that I prepared and shared at the start of each of the three COVID19 lockdowns, this menu carries ingredients and leftovers from meal to meal to minimise food waste and maximise value for money. Ingredients with short shelf lives such as meat and fish are used in the first half of the menu so that those of you who do a single weekly shop don’t have to worry about expensive ingredients ticking over their use-by dates.
For our vegetarian, vegan, dairy and gluten-free followers or those with other dietary needs, I apologise that not all of these dishes will work for you however I hope that you can still perhaps adapt some of these meals to your requirements or take inspiration from the core concept of carrying over key ingredients or leftovers into other meals. Feel free to replace or omit ingredients and to play around with the recipes and the menu to suit your dietary requirements.
Please click each link to be taken through to the web page with ingredients and instructions.
Use leftover chicken (you can really strip the carcass and use all the bits for the soup) for this classic comfort food meal. Vegetarians and vegans, omit the meat and replace with additional oriental greens, and swap chicken stock for veg stock. Take leftovers to work for lunch.
Leftover winter veg and a few eggs is amazing served with cavalo nero salsa. Vegans can make bubble and squeak with leftover roast veg. Take leftovers to work for lunch.
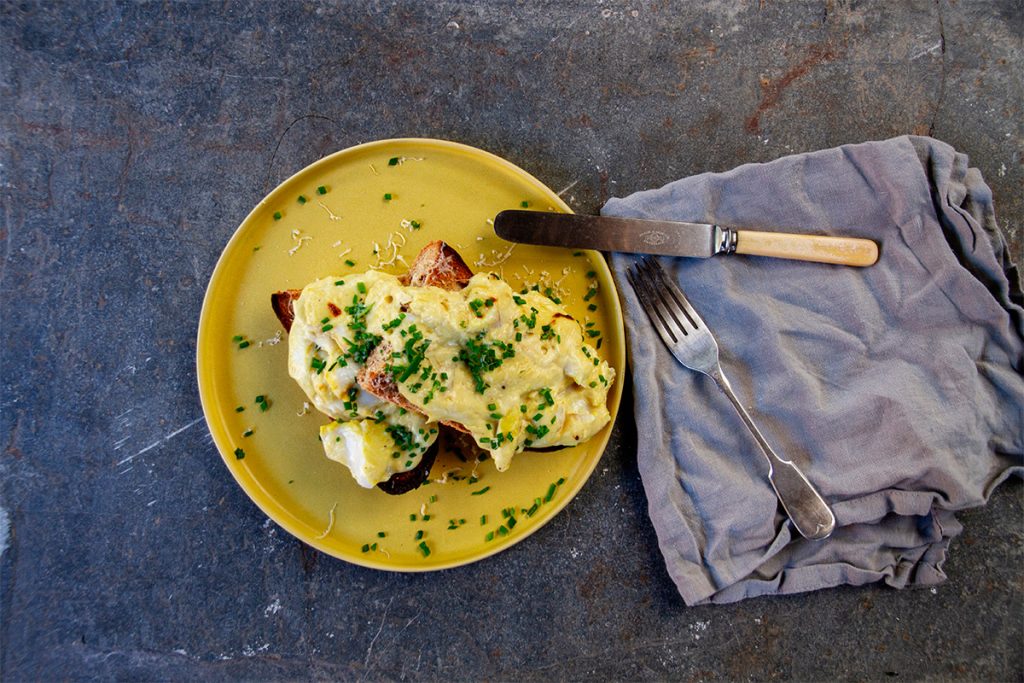
It is said that cheese and fish don’t go together, but I’d say there are a couple of exceptions: fish pie, and this recipe. This dish is a cross between a kedgeree and a classic rarebit. It’s simple, full of flavour, and amazing for a light midweek dinner.
Another great light and easy midweek dinner, and if this menu is a bit light on meat for your liking then you can always pair it with sausages or similar. Use veg stock instead of chicken stock and cream to make this vegan.
Lentils are a great and versatile source of cheap protein, and if you want to reduce your impact on the planet then they are absolutely the way to go. Dhal is a lentil dish that is then tempered with a spiced oil (the tarka). Dhal is almost infinitely adaptable, easy to make and a great source of leftovers for lunches.
A warming dish for a winter weekend that I prepared for our friends at Rodda’s this autumn. Make it vegan by leaving out the cream.
We teach elements of menu planning and how to make the most of all of your ingredients through all of our cookery courses. Our upcoming Eat Well For Less cookery course is now fully booked, but keep an eye out as we’ll be running it again in 2023.
There’s no denying the change of seasons any more. Autumn is here, and it’s the start of comfort food season! That usually means melted cheese. Quesadillas are a traditional Mexican dish that is basically a cheese toastie made with corn (or wheat flour) tortillas, heated in a dry pan rather than being fried in oil. This version adds refried beans, another Mexican staple, to make the dish into more of a meal. Beans are a great source of plant-based protein and fibre, and they’re cheap and a very sustainable ingredient, helping to save your pounds and the planet. Furthermore, like many low-cost folk recipes with many variations, quesadillas are a great vehicle for leftovers – you can add leftover roast sweet potato, fried mushrooms, shredded leftover roast meat… it won’t be a traditional quesadilla anymore, but it’ll be delicious. Here’s our base recipe, which makes a great quick autumn lunch or light dinner.
INGREDIENTS
1tbsp olive oil 1 onion, finely chopped 2 garlic cloves, finely chopped 1 tsp cumin seeds 400g can of beans (black/red kidney/cannellini 2 tsp smoked paprika 8 flour tortillas 100g cheddar or comte, coarsely grated Spring onions Coriander leaves(handful)
METHOD
Heat the oil in a large frying pan and cook the onion and garlic for about four minutes until softened. Add the cumin and cook for one more minute. Tip in the beans, paprika and a splash of water. Using a fork, break the beans down as they warm through to make a rough paste. Season generously. Spread the refried beans onto 4 of the tortillas and scatter over the cheese and coriander, then place another tortilla on the top of each like a sandwich. Wipe the frying pan with kitchen paper and return to the heat, or heat a griddle pan. Cook each quesadilla for 1-2 minutes on each side until the tortillas are crisp and golden and the cheese is melting. Serve warm, cut into wedges, with chopped spring onions and soured cream for dipping, and any extra beans on top.
Stone fruit season is finally here in the UK – as sure a sign of summer as any. This recipe makes the most of in-season peaches, and is a delicious desert but you should definitely save some leftovers for breakfast. Speaking of breakfast, for this crumble topping I added some leftover granola to give it a bit of extra crunch. Serve it hot or cold, but always with clotted cream.
INGREDIENTS
At least 6 peaches, halved and stone removed
Demerara sugar
Cinnaomon or mixed spice
Sherry
Plain flour
Caster sugar
Unsalted butter (cold, from the fridge)
Granola
METHOD
Preheat your oven to 220C.
Place the peach halves skin-side down on a lined baking sheet. Sprinkle with demerara sugar, cinnamon or mixed spice, and a splash of booze (I used sherry, last time I made this).
Roast for 20 minutes.
After removing the peaches, turn the oven down to 180C.
Meanwhile, make your crumble topping in a large bowl. Using a 2:1:1 ratio of flour:sugar:butter, combine the flour and sugar in the bowl, then cut your cold butter into cubes, add to the bowl and rub-in using your fingertips and thumbs. You should end up with a breadcrumb consistency. Add any left-over granola you may have for some added texture and crunch.
Lay out your peach halves in shallow baking dishes, skin-side down still, and sprinkle your crumble mix over the top.
Bake your crumble in the oven at 180 for 35-40 minutes, or until you can see the fruit mix bubbling and the topping has turned golden.
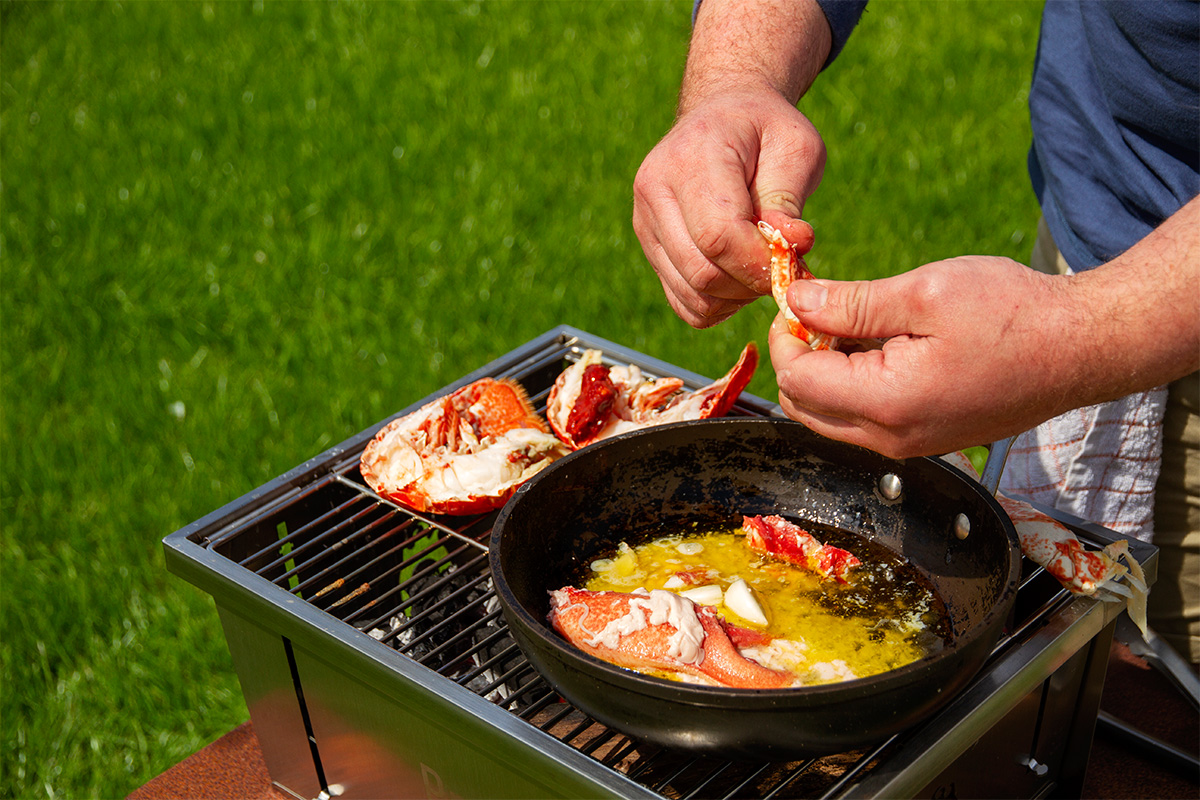
Lobster is considered something of a luxury these days, but that shouldn’t stop you from treating yourself every now and then. A few weeks ago we paid a visit to the National Lobster Hatchery at Padstow, to learn about how they’re working to conserve and restore populations of wild lobsters in our coastal waters – the benefit for the rest of us being that there should then continue to be enough lobster to allow some to be caught, cooked, and consumed.
These rolls can be served hot or cold, but must always be served outside in the sunshine, preferably with a sea view.
PREPARING YOUR LOBSTER
If you’ve picked up a pre-cooked lobster from your fishmonger then follow Cornwall Good Seafood Guide’s instructions on how to humanely kill your lobster. Boil your lobster for six minutes, then remove from the pan and allow to cool. When you’re ready to make your lobster rolls you can then split the body and tail down the centre line with a sharp knife and grill shell-side-down on the barbecue, and crack the claws to remove the meat which you can then pan-fry in a good amount of butter. I also added some nduja to the tail meat (completely optional) as it warmed, for some of that unbeatable spiced pork and seafood flavour.
TARTAR SAUCE INGREDIENTS
Good mayonnaise
Gherkins
Dill
Tarragon
Chives
Dijon mustard
Lemon – juice and zest
METHOD
Finely chop the gherkins and herbs. Then combine all ingredients together, season and serve.
CUCUMBER SALSA INGREDIENTS
1 tomato
1/2 cucumber
1 garlic clove
1 red onion
2 tsps red wine vinegar
METHOD
Finely dice all the ingredients, mix in a bowl with vinegar. Season and serve.
ASSEMBLY
Take your roll – I used potato rolls, but a popular choice is a good hot-dog style bun – butter it and toast it on the grill. Then simply load it up with your lobster and either a decent helping of tartar sauce or cucumber salsa, and get stuck in!
This is an amazing dessert to try next time you are barbecuing or cooking outside. It’s got everything going on and tastes like sunshine – charred and caramelised pineapple, with flavours of coconut and mint, and the crunch of nuts. One pineapple will serve eight people, and other than cooking the pineapple over the coals the rest of it is an assembly task. If you’re cooking this as part of a bigger barbecue meal and there’s meat involved, cook the pineapple first or on a separate grill rack.
INGREDIENTS
1 pineapple Brown sugar 1 large tub of Greek style yoghurt 1 handful desiccated coconut Half a handful of mint Small bag of mixed nuts and raisins
*Optional* Knob of butter Splash of rum 8 small meringue nests
METHOD
Cut the top and the skin off the pineapple, and split into eight lengthways (quarter it and then cut each segment in half again). Cut out the central core part of each slice, and place on the grill over the hot coals to cook. Allow the pineapple to char, before turning. Once charred on several sides, you can remove the pieces using tongs and place in a bowl. If you are not doing a vegan version then add some knobs of butter to melt and coat. Sprinkle brown sugar over liberally and, if making boozy, a splash or two of rum. Return to the grill to caramelise. Meanwhile, roughly chop the mint and combine with the desiccated coconut.
On each plate place a large dollop of yoghurt, some crushed meringue (optional), a sprinkling of nuts and raisins, and a sprinkling of the mint and coconut mixture. Place the caramelised and charred pineapple slice on top, and serve.
At the start of last year, during that third lockdown that we’d all rather forget, Lori of restaurant and recipe blog mybossbuysmelunch and her Mum joined one of our online enriched dough courses for a day of stay-at-home baking.
“I ate three in ten minutes and I’m totally on board with that. So damn good I am going to have to ration how many times I make these!”
Lori shared the recipe for our cinnamon twists with her followers shortly after, and it’ll come as no surprise to anyone that they proved mighty popular. We thought it only fair then that we share her write-up with everybody else too!
INGREDIENTS
200g Full Fat Milk 2 Medium Eggs 600g Strong White Bread Flour 12g fast action yeast 50g caster sugar 10g Salt 200g unsalted butter at room temperature For the filling: 150g soft brown sugar 75g unsalted butter at room temperature 2 tbsp ground cinnamon For the glaze: 50g caster sugar dissolved in 2 tbsp water to form syrup
METHOD
In a stand mixer with a dough hook, mix together the butter & flour until well combined then add the sugar, salt & yeast. Whisk together the milk and eggs then add to the stand mixer & bring together for circa 5mins until the dough has formed a ball. Once happy place the dough in a bowl, cover with a clean tea towel and leave to prove for 2-3 hours until it has doubled in size.
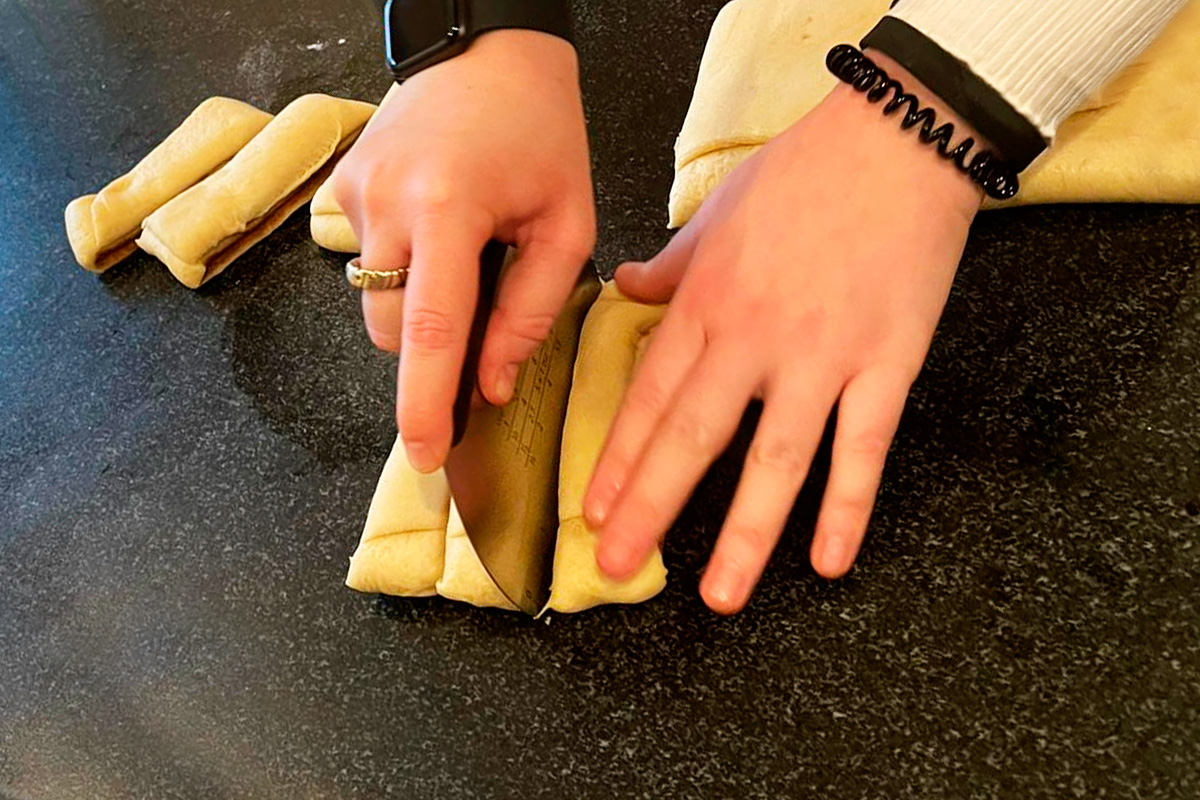
Then, lightly flour a surface & roll the dough into a rectangle (30 x 25cm). For the filling, beat the butter & sugar together until a smooth paste forms & add cinnamon. Spread the filling over the top of the dough.
With the long side of the dough facing you, fold a third across towards the middle and repeat on the other side to enclose the filling. Then slice width-ways into 12 even strips. Next, use a sharp knife to cut down the middle of each strip leaving an inch in tact at the top. Twist the two strands together and then roll up to stand on the flat end. Grease a 12-cup muffin tray and pop the knots into the tray, leaving them to prove for 15mins.
Preheat your oven to 200°/ 180° fan. Brush the knots with egg glaze and cook for about 15 mins (our oven is super hot and only took 11, so check!). Once cooked and still hot, brush the knots with sugar glaze and leave to cool slightly before tucking in.
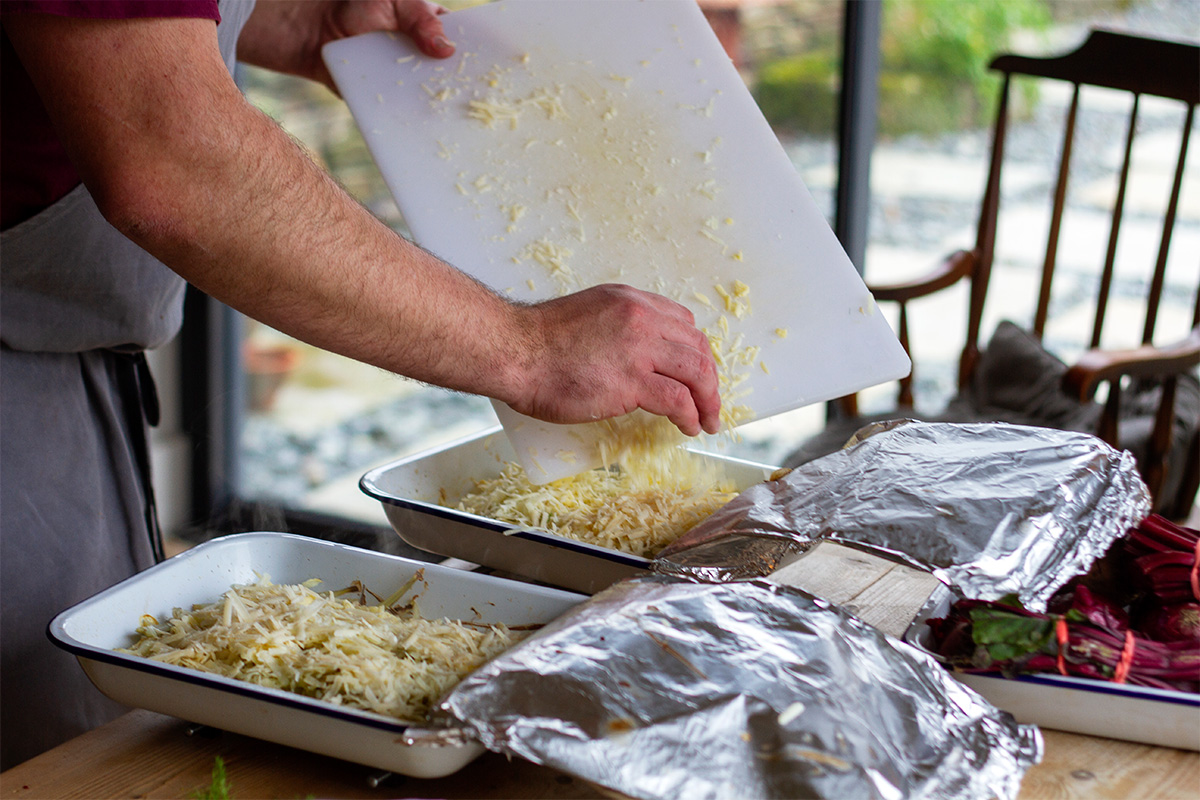
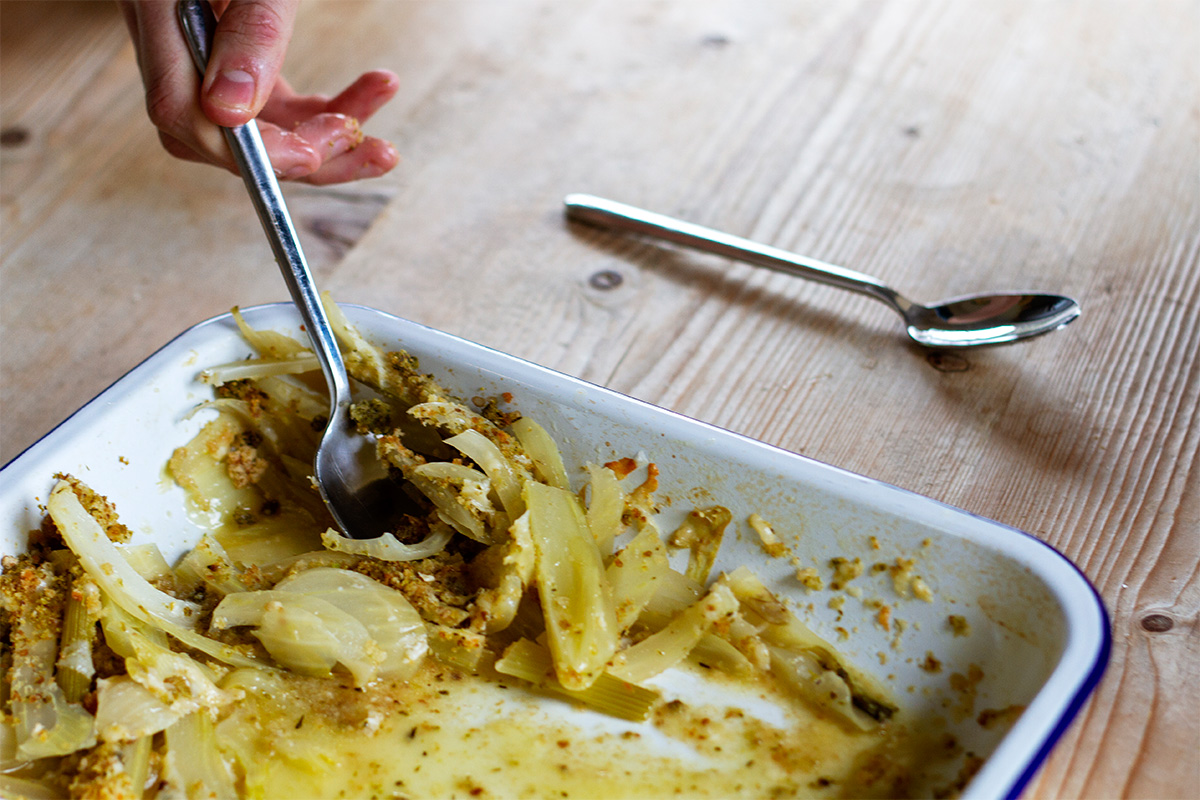
Fennel is a really underrated vegetable here in the UK, whereas in Italy it’s incredibly popular. It’s an umbellifer from the same plant family as carrot, celery and parsley, and has a mild aniseed flavour and the whole plant is edible from the bulb up to the leaves and flowers. In this recipe we’re going to use the bulb to make a fantastic gratin that can be served as a side with roasts, or as a light lunch. It’s pretty similar to boulangère potatoes, and is really easy to make.
INGREDIENTS
1kg fennel
50ml dry white wine or 1 x tbsp white wine vinegar
All of these storms call for a healthy serving of comfort food, and it doesn’t come much more comforting than a big bowl of ribollita. Ribollita is a traditional hearty Tuscan soup or stew, made with stale bread and featuring “dark greens and lots of beans”. Ribollita translates as “reboiled” which, along with its loose recipe gives away it’s Italian peasant origins; it was made by reboiling leftover vegetable or minestrone soup and bulking it out with beans and leftover stale bread. The bread should be crusty and a little stale, so that it soaks up some of the liquid but retains its shape rather than dissolving! As yet more named storms batter the country, I’d encourage you to make a big pot of ribollita, hunker down, and get comfy!
Ribollita (serves 4-6)
INGREDIENTS
Cannellini beans (or any tinned/dried beans) if dried, soak overnight
1 bay leaf
High welfare pancetta
1 tomato
2 red onion
2 carrots
2 sticks of celery
3 cloves garlic
Tsp fennel seeds
½ fresh chilli (optional)
1 tin tomatoes
1 handful of stale crusty bread
⅔ cavolo nero
¼ of a cabbage
FOR THE ANCHOVY DRESSING
1 tin anchovies
Handful parsley/dill/basil
1 clove garlic
Red wine vinegar
Olive oil
METHOD
Finely chop your carrot, onion, celery, garlic then heat a large pan with a splash of olive oil, bay leaf and pinch of salt. Add the pancetta then sweat the veg very slowly, adding water if necessary. Sweat for a good 10-15 mins, not browning the vegetables.Then add the tomatoes and season. Add the beans with a little water and generous amount of black pepper, bring back to the boil. Then slice the cabbages and add to the pot. Roughly tear the bread and throw it in. The soup wants to be thick but not dry, so just keep an eye on the water level and adjust if necessary. For the dressing finely chop the anchovies, herbs and garlic. Then combine with the vinegar and oil. Ladle into warm bowls and finish with the dressing on top. Serve on a cold and wet evening.
It’s turned out to be another “dynamic” Christmas party season, but regardless of whether and how your plans have changed, you should still be able to enjoy some canapés and drinks over the festive period – even if it is just at home with your nearest and dearest. Whenever we serve canapés at an event, this one is always so popular, and the one that the most people ask me for the recipe for. And, it’s so simple and quick to make, which means less time in the kitchen and more time enjoying those Christmas drinks.
INGREDIENTS
4 x smoked mackerel fillets
1 tbsp dijon
4 tbsp creme fraiche (sour cream or cream cheese instead)
Handful of dill, finely chopped
1 tbsp horseradish cream
Lemon zested and juiced
3 tbsp capers
Crusty bread to serve/pickled shallots
METHOD
1. Remove skin from fillets and place them into a bowl.
2. Zest the lemon and then squeeze half the juice in. Save the other half to adjust seasoning later.
3. Add the rest of the ingredients. Mix together thoroughly with a fork try not to use a blender or food-processor as you’ll get a much better consistency by hand.
4. Taste, then add black pepper and more lemon juice if required.
5. Serve with pickled shallots and crusty bread. Perfect as a starter, light meal, or canapé!
The role of what we eat in contributing to or helping to avert the worst of the unfolding climate crisis is increasingly well publicised. When it comes down to what we can do as individuals, it is often cited as being as impactful as the other obvious lifestyle changes that we can make such as how we power our homes or travel. It’s a complex issue, though, and definitely not as simple as many campaigners would have you believe. You don’t need to switch to a completely plant based diet (although there’s nothing wrong with that), all you have to do is consider what you eat, how and where it’s produced, and make a few small changes. It’s not a binary issue. Reducing the impact of your diet on the planet runs through a lot of what we do here, albeit usually quite discretely (zero waste recipes or sourcing ingredients that are sustainable or from regenerative sources), and this article and recipe is no different.
“The Planetary Health Diet emphasizes a plant-forward diet where whole grains, fruits, vegetables, nuts and legumes comprise a greater proportion of foods consumed. Meat and dairy constitute important parts of the diet but in significantly smaller proportions than whole grains, fruits, vegetables, nuts and legumes.”
EAT-Lancet Commission
Autumn and winter are stew season. From the warming spices of North African tagines, through cassoulets to casseroles and hot pots, this is the time of year when a big pot of hearty food provides comfort and warmth.
GUERNSEY BEAN JAR
The Channel Island of Guernsey is within sight of the north coast of France, and the island’s traditional cuisine is a blend of English and French influences much like many other areas of the island’s culture. Guernsey bean jar is a slow cooked bean-heavy casserole that dates back hundreds of years and takes obvious cues from French cassoulets. These days it’s more of a novelty item on menus or is served up at special events and occasions on the island, but until the 1920s it was still commonly eaten for breakfast. It was traditionally prepared by islanders at home in a ceramic pot (the “jar”) that was then taken to the local bakery after they’d finished baking for the day to be left in their cooling oven to cook overnight (usually on a Sunday) before being collected in the morning. Like so many folk dishes, there is no set recipe and many families had their own versions, with recipes passed down orally or by demonstration. As long as it contains beans, carrots, onions and a cheap cut of meat with the bone in (the bone helps to produce a rich, thick gravy), and is cooked low and slow, then it qualifies as bean jar. It’s incredibly easy to make (perfect if you’ve got a slow cook pot or work from home and can put it on in the morning ready to eat for dinner), uses cheap and often unpopular cuts of meat that reduces waste (it’s a great one for nose-to-tail eating), and those all-important dried legumes that we all need to eat more of are the main ingredient. Here’s how to make Guernsey bean jar.
INGREDIENTS
200g dried haricot beans
200g dried butter beans
1 large onion chopped
2 carrots chopped
1 pigs trotter or a slice of shin of beef, bone-in
1 bay leaf
1.5 litres beef stock or water
METHOD
Soak the beans overnight in water.
In the morning, put all of the prepared ingredients and about ¾ of the stock into a large casserole dish or slow cook pot. Put a lid on or cover and put in an oven at 150-170°C for 6-8 hours. Check the bean jar occasionally and add more stock or water as required to stop it from drying out and to produce a gravy. Remove from the oven, take the bone (and any cartilage, if you used a pig’s trotter) and bay leaf from the stew, and adjust the seasoning before serving.
As there is no strict recipe, you can use all haricot beans (just double the quantity), add more vegetables or potatoes, or make it vegetarian by omitting the meat and using vegetable stock.
*It’s worth noting here, on the environmental front, that haricot beans (the most popular pulse in the UK, because they are the beans in baked beans) are not grown commercially in this country. Almost all of the beans in tins of baked beans consumed in the UK are imported from the US, Canada, Ethiopia and China. Shipping dried beans is a very efficient way of freighting food (because you’re not transporting a large weight of water, and the good news is that new varieties of haricot bean are being bred to grow successfully in British sunlight. Like I said in the introduction, the environmental impact of what we eat is a complex topic!
Saffron buns are a traditional Cornish teatime treat – a rich yeast bun not dissimilar to a teacake, only better! Saffron is the world’s most expensive spice by weight, so how did it end up being a key ingredient in Cornish baking? Spices such as saffron were often landed in Cornwall, both legally and illegally, with records showing that it was once traded with the Phoenicians for tin and copper. The county’s mild maritime climate also made it one of the few places in the UK where the crocus flowers that produce saffron could be grown commercially. It’s been a couple of centuries since saffron was produced commercially in Cornwall, however one farm is now growing it here on the Roseland Peninsula. With such ready access to saffron, it was baked into revel buns on special occasions with so much being used that it gave the buns a characteristic yellow colour. For the past hundred years it’s been prohibitively expensive to use that much saffron, so many bakers used food colourings to turn their buns yellow. This recipe that I recently baked for Rodda’s Cornish Clotted Cream uses a decent pinch of saffron and clotted cream to create a rich, spiced, teatime treat. Enjoy!
INGREDIENTS
300ml whole milk Large pinch of saffron 50g Rodda’s clotted cream, melted 2 tsp mixed spice 550g strong bread flour 1 tsp fine sea salt 80g caster sugar 1 x 7g sachet fast-action yeast 100g sultanas/currants 4-tablespoons of milk For the glaze: 50g caster sugar 2 tablespoons of water
METHOD
Gently heat the milk with the saffron in a small pan until it’s steaming. Add clotted cream to the saffron-infused milk and return to a low heat for 2-3 minutes. Gently whisk until melted and combined.
Take the mixture of the heat and allow to cool until it is warm to the touch
Sift the flour into a large bowl and stir in the salt, spices, sugar, and yeast.
Make a well in the centre of the dry ingredients and pour in the warm milk. Mix and bring together into a soft dough. Knead on a slow speed in a free-standing mixer with the dough hook attached for 7-10 minutes, or slap and fold a few times to bring it together. After 5 minutes, incorporate the currants. To check if the dough is ready, when the dough is touched it should bounce back.
Cover the bowl and leave in a warm place for 45-60 minutes or until doubled in size. Knock back the dough and turn out onto a floured surface and knead briefly.
Divide the dough into 10 equal portions to make buns and place on a lined baking sheet.
Cover the buns and leave to prove again for 30 minutes.
Preheat the oven to 200°C, fan 180°C, gas mark 6. Then brush the top of the buns with a little milk and bake for 20 minutes until golden.
Once the buns have baked, its time to make the glaze. To make the glaze – put 50g of caster sugar and 2 tablespoons of water in a saucepan. Gently heat until the sugar has dissolved and then boil for 1 minute. Then brush the mixture over the warm buns and transfer them to a wire rack and leave to cool.
Slice in half and enjoy the buns fresh or toasted, spread with more clotted cream.
St Ives Food & Drink Festival took place on Porthminster Beach on the weekend of September 17th, 18th and 19th. Whilst it rained on the Friday, by Sunday when I was hosting the Asado Pit Chef’s Stage, out on the sand with St Ives Bay and Godrevy Lighthouse as our backdrop, the sun had come out and we had a glorious day on the sand.
Photo by Adam Sargent
I spent most of the day up front with a microphone in my hand, alongside some amazing chefs like Jeffrey Robinson, the owner and executive chef of the New Yard Restaurant, The Idle Rocks’ head chef Dorian Janmatt, and Simon Hulstone of The Elephant in Torquay. I had a lovely catch up with Porthminster Beach Café’s chef de patron Mick Smith and we spoke about collaborating on some future projects (watch this space) and I even managed to squeeze in a demo of my own!
Photo by Adam Sargent
If you didn’t get a chance to get down to St Ives for this year’s event then I’ll share the recipe for my demo dish below, which I can best describe as “posh kebabs”, and be sure to mark your diary for next year’s event. There really is no other food festival quite like this one!
Photo by Michelle Nash
Flatbreads with venison, beetroot relish, tahini yoghurt, smoked mushroom and burnt leeks.
As I was cooking on the Asado Pit Chef’s Stage, I was cooking over fire. Therefore, these instructions are for cooking on your barbecue, but you can adapt to cook it inside on your hob. I cooked venison loin from Westcountry Premium Venison – I’ll repeat it later, but that’s because it’s important: DON’T OVERCOOK YOUR VENISON! It’s really lean so you want it no more than medium-rare. Ok, here’s the recipe:
First up, to make the flatbreads get a mixing bowl and use a spoon to mix together 350 g self-raising flour, 1 teaspoon baking powder and 350 g natural yoghurt, then use clean hands to pat and bring everything together. Dust a clean work surface with flour, then tip out the dough. Knead for a minute or so to bring it all together (this isn’t a traditional bread recipe, so you don’t need to knead it for long – just enough time to bring everything together). Put the dough into a floured-dusted bowl and cover with a plate, then leave aside for a while. Dust a clean work surface and rolling pin with flour, then divide the dough in half, then divide each half into 6 equal-sized pieces (roughly the size of a golf ball). With your hands, pat and flatten the dough, then use a rolling pin to roll each piece into 12cm rounds, roughly 2mm to 3mm thick. Cook each flatbread on the grill for 1 to 2 minutes on each side, or until bar-marked and puffed up, turning with tongs. Brush the flatbreads all over with herby garlic butter or oil as they come off the griddle.
To make the beetroot relish, grate or finely shred beetroot and mix with red wine vinegar, sugar and mixed spice, then set aside until later.
I smoked the mushrooms by placing them on the grill and covering them with a metal bowl (or you could use a lid) to retain the smoke and moisture. Cook the leek “dirty” directly on the coals, and once softened you can strip back as much or as little of the charred outer leaves as your like.
Take your venison and cook that dirty too, putting it straight onto the coals. Venison only needs a couple of minutes – cooking it any more than medium rare will make it tough and leathery as it’s such a lean meat. Don’t overcook it! Take the meat off the coals and rest it in a warm place until you assemble your kebab. If cooking inside on your hob, simply cook your leeks and venison in a very hot pan.
To make the tahini yoghurt mix one part tahini with four parts yoghurt, a crushed clove of garlic and a pinch of salt. Gently cook off the beetroot relish in a hot pan for a few minutes.
Photo by Michelle Nash
Bring it all together by slicing your venison, then pile a bit of everything into a flatbread and tuck in!
In our latest recipe video, I’m preparing and cooking a beautiful “Jacob’s Ladder” short rib of beef from Meat & Co. Jacob’s Ladder is the crème de la crème of beef ribs, cut from the front ribs of the chuck and plate of the beast to give a neat cross section of shortened ribs with plenty of meat attached. Click play and I’ll show you how to slowly braise it with spices (in this case a Middle Eastern mix, but you could also do a classic barbecue blend or a Chinese style spice mix) and red wine beef stock in the oven, before smoking it on the barbecue, creating ribs that are the best of both worlds. I find that if you smoke a joint like this on the barbecue the whole time it can get a bit tough, whereas by braising the ribs low and slow in the oven for 3-4 hours first before finishing it on the barbecue with some oak smoke, it retains a lot of moisture and the end result is much better.
WARNING: once you’ve made this you’ll be putting it with everything. Chorizo jam brings all the flavour, and is really versatile. You can stir it through leftover roast potatoes or a hash, dollop it in burgers, serve it as part of a cheese board, add it to a tomatoey pasta sauce, pair it with scallops, or just eat it straight off the spoon…
INGREDIENTS
Chorizo
Dark Brown Sugar
Apple Cider Vinegar
METHOD
Put your chorizo in a food processor and blitz it with some dark brown sugar. If you are using a shop-bought chorizo (usually about 225g) then go for about 2 tbsp/50g of dark brown sugar, and adjust quantities accordingly. Add a splash of good quality apple cider vinegar. Cook the mixture gently in a saucepan until it has reduced and thickened to the consistency of… well, jam! You can adjust this recipe to suit your tastes – more sugar for a sweeter jam, more vinegar for a bit more tang, a pinch of paprika for more heat or a smidge of chipotle for a bit of smokiness. Spoon your chorizo jam into sterilised jars, seal, allow to cool and keep it in your fridge for as long as your willpower lasts.
It’s barbecue season (in fact, at the time of publishing, it’s the middle of National BBQ Week) and this is a must-make sauce for next time you’re cooking meat over a fire. Forget ketchup. This is the original. Chimichurri is an oil-based condiment from Argentina and Uruguay that is traditionally served with barbecued or grilled meats. It’s an essential element of our full-day Asado experience, but is a great sauce to make for any outdoor cooking occasion.
INGREDIENTS
1 shallot, finely chopped
1 fresh chilli, finely chopped
3-4 garlic cloves, thinly sliced or finely chopped
1 tbsp red wine vinegar
1 tsp salt (plus more)
1tsp sugar
½ cup finely chopped coriander
¼ cup finely chopped flat leaf parsley
2 tbsp finely chopped oregano
¾ cup extra virgin olive oil
METHOD
Finely dice the shallot and garlic and add to a bowl. Season, and pour over half of the vinegar and let it sit for 10 minutes. Stir in the rest of the ingredients, using a fork to whisk in the oil.
Romanesco is a tomato-based sauce that originated from Valls, Tarragona, Catalonia. The fishermen in this area made this sauce to be eaten with fish. It is typically made from any mixture of roasted peppers and tomatoes and garlic, toasted almonds, pine nuts, and/or hazelnuts, olive.
It goes with anything, but if you want to up your fish intake then hit up some great local suppliers and give romanesco sauce a go! I like to serve it as pictured, with pan fried hake and tapenade, finished with a sprinkling of parsley.
INGREDIENTS
100g almonds
200g roasted red peppers from a jar, drained (or BBQ/grill them)
1 garlic clove
1 tbsp sherry vinegar , plus extra to season (optional)
1 tsp smoked paprika
50ml olive oil
METHOD
Toast the almonds in a dry frying pan for 3-4 mins until starting to turn golden and smelling toasted. Shake the pan often to turn them. Tip out and leave to cool.
Drain the red peppers and tip into a food processor with the almonds, garlic, vinegar and smoked paprika, then blitz to a chunky paste.
With the motor still on, slowly drizzle in the olive oil to make a dip. A bit of texture works well for this rather than blending to a super smooth consistency. Season well, adding a little more vinegar, if you like.
The short season for English asparagus is now underway, and because this incredible produce is only available for six weeks or so I’d encourage you to eat as much of it as you can whilst you have the chance!
This recipe makes a great light lunch and if you don’t have a lidded barbecue or don’t want to light a fire to cook over then you can also cook it in your kitchen under the grill. The main thing is that you cook it in a sealed or covered environment (such as a smoker or lidded barbecue) so that the steam and smoke can cook and flavour the asparagus and mozzarella.
With a long weekend coming up, it’s definitely time to dust off your barbecue if you haven’t already. Pick up a bunch of new season English asparagus and some good mozzarella, and treat yourself.
INGREDIENTS
Bunch of English asparagus
2 balls of mozzarella
Good quality EV olive oil or rapeseed oil
Pomegranate molasses
Red wine vinegar or juice of one lemon
Pinch dried chilli flakes
METHOD
Light your barbecue and allow the fire to burn down until you have a bed of hot coals.
Snap the woody ends off the asparagus spears (hold the bottom end and mid point and bend, and the spear will snap at the right place). Keep two back and place the rest of them on the grill.
Cook until beginning to char, then turn the asparagus spears over. Bunch them together on the grill and place the two balls of mozzarella on top of the asparagus, then place the lid on your barbecue (or cover with foil if you don’t have a lid). The idea is that the moisture steams the asparagus and mozzarella and it takes on a bit of the smokey flavour.
Use a speed peeler to peel the two reserved raw asparagus spears lengthways into strips.
Check after three minutes, and once the asparagus has charred on the other side and the mozzarella is starting to melt, use a spatula to remove it to a serving dish.
Place the peeled asparagus strips on top of the mozzarella.
Dress with a good slug each of olive or rapeseed oil, pomegranate molasses and red wine vinegar or lemon juice. If you like an element of heat then sprinkle over a pinch of dried chilli flakes.
You can serve this as it is, or with charred ice gem lettuce or on a piece of toasted focaccia. If you want to take yourself to dairy heaven then you could even spread cream cheese on the toasted focaccia before piling it high with your baked and burnt asparagus and mozzarella.
It’s the season for ramsons, better known as wild garlic because of the pungent smell that fills old woodlands at this time of year. Early in the season, through March and into April, is the best time to pick a few of the young leaves where and when you come across a large carpet of them under the trees. Most people use wild garlic leaves to make pesto, but it can and should be so much more than that. Now that we’re a few weeks in to their season, if you’ve had your fill of wild garlic pesto and want to try something else then here’s a great recipe that combines them with wonderful Cornish sole.
About Cornish Sole
Cornish sole is the new name being used for megrim sole, a flat fish that is remarkably good value and incredibly popular on the continent – so much so that until Brexit regulations put a stop to most exports, 95% of the megrim sole landed in Cornwall was shipped to mainland Europe. It’s now being renamed Cornish sole in the hope that a new name will tempt more domestic consumers to try it. Cornish sole caught by demersal trawl is deemed more sustainable by the Cornish Good Seafood Guide so try to get that if you can, then pick a handful of wild garlic leaves on your next walk and give this recipe a go!
Cornish Sole and Wild Garlic Saag Aloo
INGREDIENTS
Cornish sole (the fish formerly known as megrim sole) fillets (2 per person)
1 onion, finely chopped
2 garlic cloves, sliced
1 tbsp chopped ginger
500g potato, cut into 2cm (¾in) chunks
1 large red chilli, halved, deseeded and finely sliced
½ tsp each black mustard seeds, cumin seeds, turmeric
Large handful wild garlic leaves
METHOD
Heat 2 tbsp sunflower oil in a large pan, add 1 finely chopped onion, 2 sliced garlic cloves and 1 tbsp chopped ginger, and fry for about 3 mins
Stir in 500g potatoes, cut into 2cm chunks, 1 halved, deseeded and finely sliced red chilli, ½ tsp black mustard seeds, ½ tsp cumin seeds, ½ tsp turmeric and ½ tsp salt and continue cooking and stirring for 5 mins more.
Add a splash of water, cover, and cook for 8-10 mins
Check the potatoes are ready by spearing with the point of a knife, and if they are, add wild garlic leaves and let it wilt into the pan.
Finally lay the fish over the top of the potatoes (adjust liquid if necessary) season and put the lid on the pan. Steam for 2-4 mins as the fish turns white you’ll know it’s cooked!
I absolutely love cabbages. These brilliant brassicas are available all year round because there’s always a variety in season, however February is when the classic spring green and savoy varieties are at their best. Here’s a little mix up to add to your repertoire in readiness for spring and summer.
INGREDIENTS
1 Sweetheart/hispi cabbage, halved
1 lemon
15 g Parmesan cheese
2 anchovy fillets in oil
4 heaped tablespoons natural yoghurt
½ teaspoon English mustard
1 teaspoon Worcestershire sauce
Red wine vinegar
Extra virgin olive oil
1 small red onion
Olive oil
METHOD
Fire up the BBQ or heat a large frying pan (and open the windows!) Char and burn the outer leaves of the cabbage.
Grate the lemon zest and Parmesan into a large bowl. Slice and add the anchovies, along with the yoghurt, mustard and Worcestershire sauce.
Squeeze in half the lemon juice, add 1 tablespoon of vinegar and 2 tablespoons of extra virgin olive oil and mix to make your dressing.
Finely slice the onions and add to the dressing…this will start pickling the onions.
Once the cabbage has cooled slightly roughly chop up, along with the romaine lettuce, and mix together with the dressing.
It is said that cheese and fish don’t go together, but I’d say there are a couple of exceptions: fish pie, and this recipe. This dish is a cross between a kedgeree and a classic rarebit. It’s simple, full of flavour, and amazing for brunch or a light lunch.
You will need:
2 fillets Smoked haddock (or other smoked fish)
25g Butter
200ml Milk
Cheese – lots! (I used parmesan and gruyère, but you could use a good cheddar)
1tbsp Crème fraîche
1tsp Mustard
1tsp Worcestershire sauce
1tbsp Flour
Lemon – zested and half juiced
Nutmeg – to grate
Chives to garnish
2 thick slices of Bread
You can find more of our recipe videos over on our YouTube channel.
The Christmas and New Year Holidays are a period full of great food – with lots of eating up of leftovers in between and afterwards! Last year I shared some delicious and different ways to use up cooked leftovers; this year, I’m going to share a recipe to use up leftover veg that maybe didn’t even make it on to the dining table in the first place: Brussel sprouts. I love sprouts… I once ate 132 in one sitting (true story). If you do too and like a little spice, then try this recipe.
Brussel Sprouts and Christmas
Brussel sprouts are a type of cabbage (we eat the buds) and a Christmas staple, but they often divide opinion. If you’ve bought in a load of sprouts but don’t know that you’re going to cook them all on Christmas Day, then why not try making kimchi with whatever you have left?
What is Kimchi?
Kimchi is a traditional Korean side dish of salted and fermented vegetables dating back two thousand years. It’s most commonly made with one or a mix of cabbage, Korean radish, carrot and onion with a blend of seasoning. Before refrigeration, it was the main way of preserving vegetables in Korea, where large earthenware jars were buried in the ground to prevent the kimchi from getting too cold in the winter and too warm in the summer. While there are countless variations, it’s general a spicy and sour flavour, and is eaten as a condiment or side dish or added to stews.
Fermenting Food And Its Benefits
Some people shy away from the idea of eating fermented food, but lots of our everyday staples, such as bread, cheese, wine and tea are all made using fermentation. In kimchi, the good bacteria that are found on the outside of vegetables are encouraged to grow, and in doing so they break down the natural sugars into lactic acid (creating kimchi’s tangy sour flavour).
Good bacteria, known a ‘probiotics’, are good for our digestive health helping with the absorption of nutrients and contributing to the strength of our immune system.
Step One: Sterilising Your Jars
You only want GOOD bacteria to develop in your kimchi, so sterilize your jars first:
Wash your jars and lids in warm soapy water and leave to dry on a draining rack – don’t touch the insides! You can dry the lids with a clean, dry, tea towel.
Place the jars and lids in a prehreated oven at 180C/160C fan/gas 4 for fifteen minutes.
Remove, allow to cool, and use!
BRUSSEL SPROUT KIMCHI
INGREDIENTS
1kg brussels sprouts, sliced or 1/4s depends if you like it chunky
1 Daikon (oriental or winter radish), cut into strips or sliced
1 Chinese cabbage, sliced
2 heads garlic, cloves peeled
1/2 cup Korean chilli flakes
2 inches ginger, peeled sliced
3 tablespoons white miso
2 tbsp gochujang
1 tbsp rice vinegar
Fish sauce to taste
METHOD
Place the shredded sprouts, daikon and Chinese cabbage in a bowl with a good handful of fine salt and mix well – don’t worry about the quantity because you’ll rinse a lot of it off afterwards. Squeeze it with your hands until some juice forms, then top it up with enough water to cover it. Weight it down with something heavy-ish like a sturdy pan. Cover and leave overnight.
Blend the garlic, ginger, miso, gochuiang, vinegar, chilli and splash of fish sauce into a blender.
Rinse the veg then mix with the garlic paste and pack into the jar, pressing it down firmly with your fist. I cover my ferments with a zip lock bag filled with water because it moulds to the shape of the ingredients and jar nicely, making sure it’s all submerged – a small dish or ramekin would be a non-plastic alternative.
Leave 4 days then taste… Adjust heat and fish sauce. Then after 10 days you’re ready to rock…
Comforting Italian beans and sirloin steak, topped with a green salsa. I cooked this outside in the farm yard on the BBQ because it was such a beautiful autumn day, but it’s just as easy on the hob.